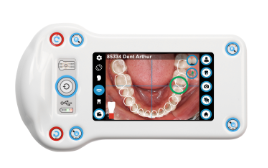
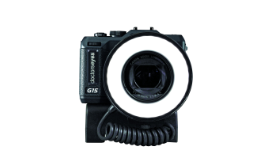
dentaleyepad manual
You can also print this guide: PDF FOR PRINTING
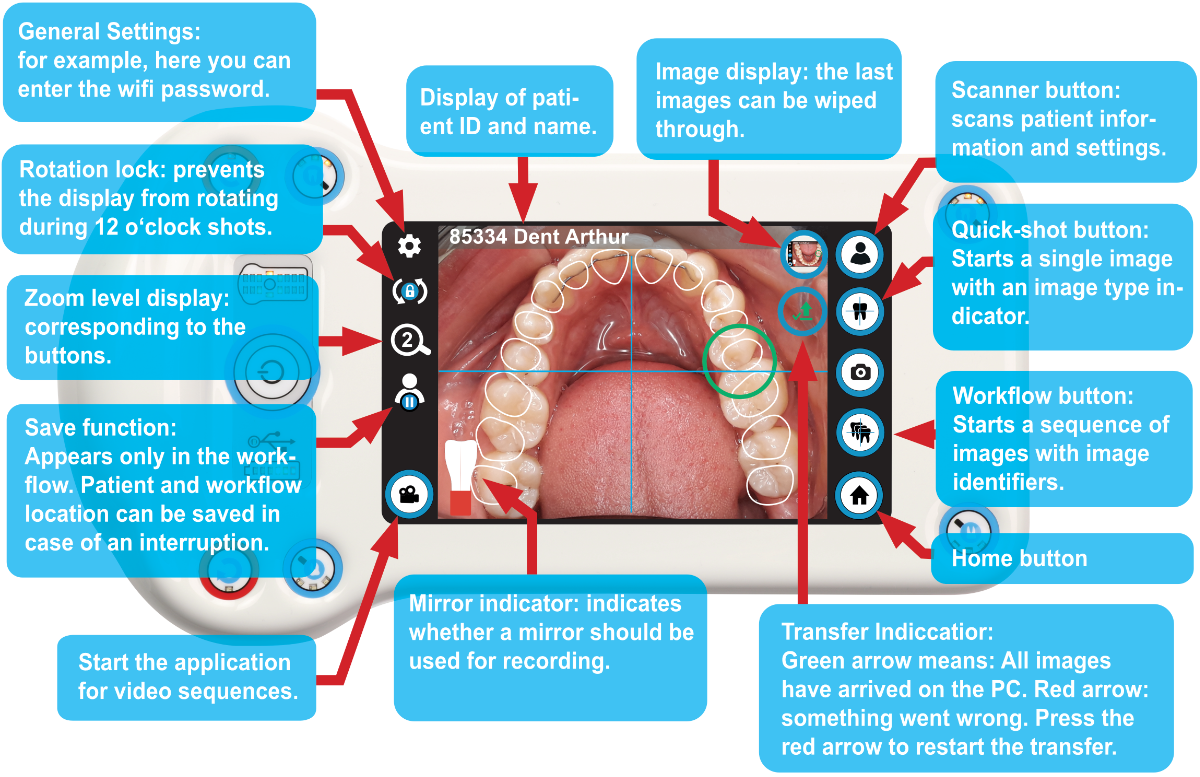
All areas with the respective windows are described below:
You can access the settings via the cogwheel icon in the top left-hand corner.
The menu items with the basic settings of the dentaleye pad are located here:

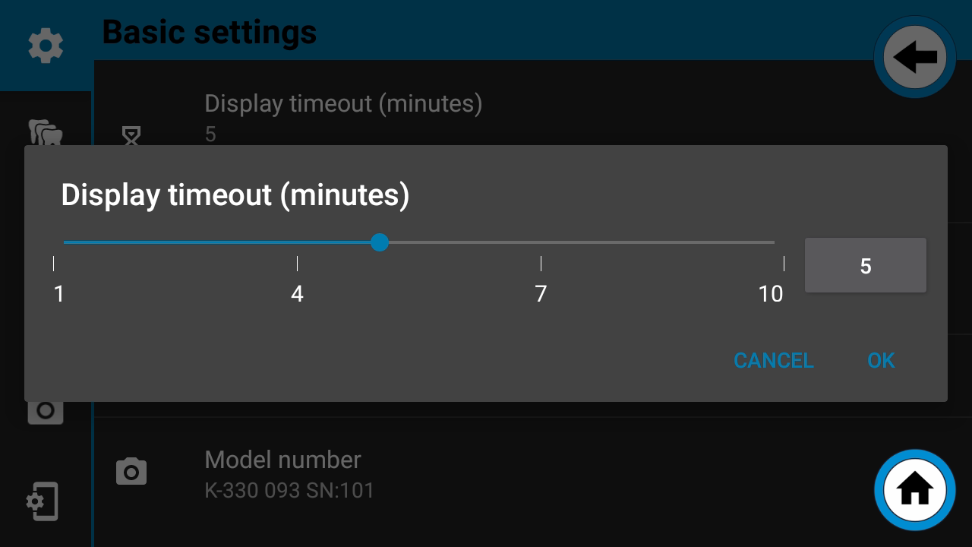
If you tap on this menu item, a timeline appears on which you can set the time after which the dentaleyepad should switch off automatically when not in use by moving the dot. The default setting here is 5 minutes. You can increase the value up to 10 minutes. If the value is to be changed, restart the dentaleyepad completely after confirming the new value with “OK”. To do this, press and hold the on/off button for approx. 3 seconds. The dentaleyepad then switches off with a triple beep. It can be restarted after a further approx. 3 seconds.
The dentaleyepad requires energy to connect to the network, for example, even when the display is switched off. If the dentaleyepad has not been shut down and the power is switched off in the practice at the weekend, for example, there is a risk that the dentaleyepad battery will be discharged over the weekend and will need to be charged on Monday morning. To avoid this, the 24-hour automatic switch-off function is activated as standard.
If the dentaleyepad is not charged and not moved within 24 hours, it switches off automatically.
As soon as it receives power again on Monday morning, for example, it boots up automatically after approx. 30 seconds and is ready for use again.
Behind this menu item you will find precise information on the camera software version.
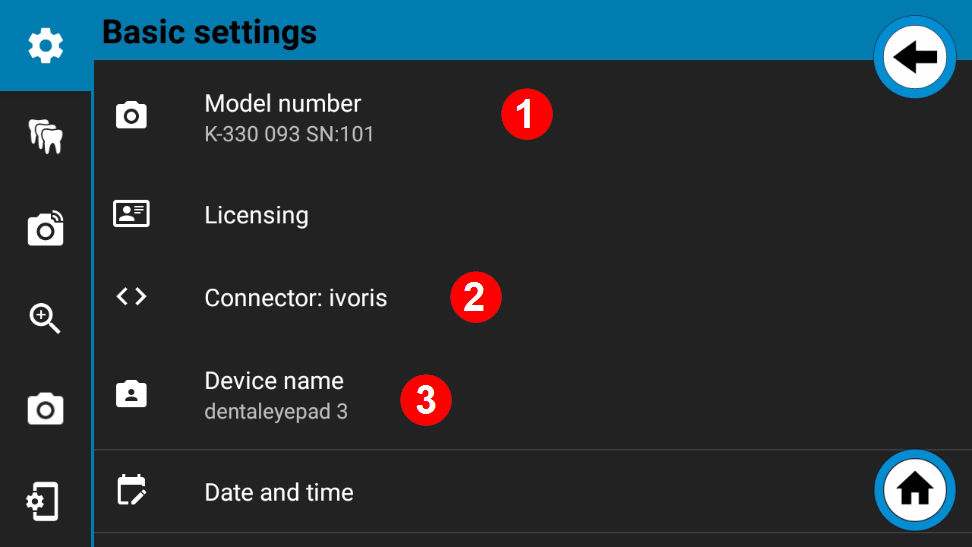
Here you will find the version number of the hardware and the serial number of your dentaleyepad.
The serial number is also located in the transparent part of the handle recess behind the doctorseyes lettering.
After successfully scanning the QR code of the dentaleyepad control center, your practice data is stored here.
The currently activated interface is displayed for Connector.
The device name indicates the name under which the device is displayed, e.g. when connected to a Windows PC via USB.
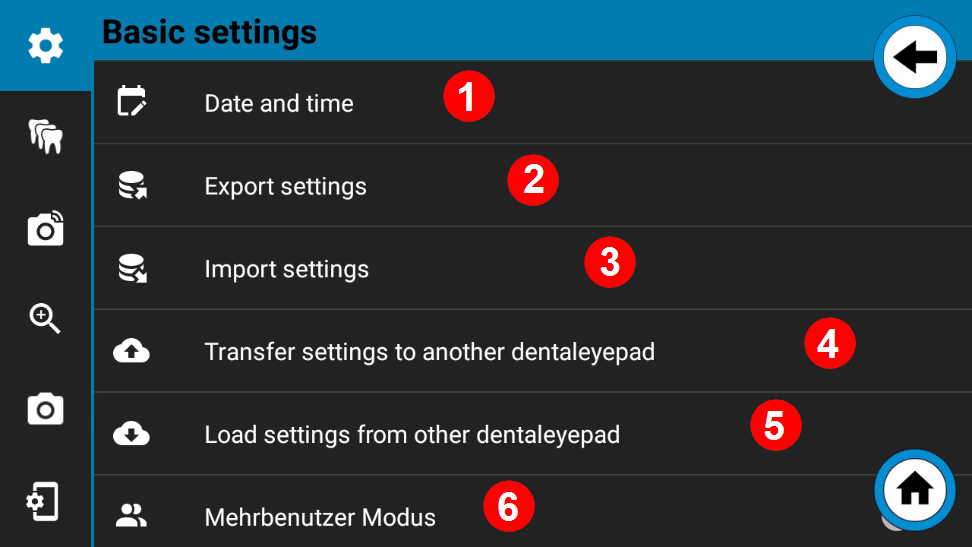
By default, the date and original time are automatically obtained from the Internet. If there is no Internet connection, this value can also be set manually.
However, this should only be seen as an emergency solution as the value would have to be re-entered each time the dentaleyepad is restarted (booted).
All settings from all areas can be saved in a backup file and restored from this file.
If several dentaleyepads are available in the practice, they can all be easily set identically using this function.
If you tap on this menu item, all settings (including workflows) are transferred to the dentaleyepad control center on the PC.
From there, they can be loaded onto another dentaleyepad using the “Load settings from another dentaleyepad” function on the respective current device.
The transfer takes place immediately when the command is tapped. The settings file remains saved in the dentaleyepad control center until it is overwritten by a newer version.
If several people use the dentaleyepad, this module should be switched on. This is also the default setting.
If this mode is switched on, information messages are always displayed.
If only one person is using the dentaleyepad, this mode can be switched off.
Some notes are then given a checkbox. If this is selected, the notes will no longer be displayed in future.
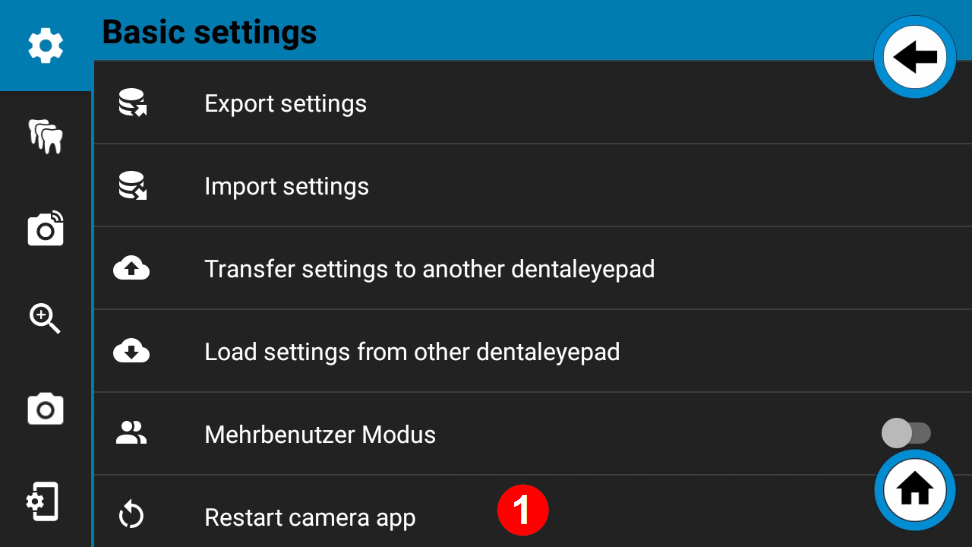
If the camera app behaves strangely, it can be closed and completely restarted with this command.
The dentaleyepad enables repetitive image sequences to be saved in so-called workflows. This makes shooting easier as no more pictures are forgotten as the photographer is guided by the overlay overlays.
The workflows can be freely named and arranged. Each workflow can contain any number of recordings.
Each workflow can also be assigned certain properties such as “color coding” or “transfer additional copy”.
Another special feature of the dentaleyepad is that all shooting parameters such as focus point (point on which the camera focuses), exposure, light scenario or zoom factor can be defined for each individual image type. One type of image is, for example, a “portrait from the left side” or an intraoral “occlusal image of the upper jaw”. This makes dental photography much easier, as the photographer no longer has to worry about settings and can concentrate solely on selecting the right image section.
All image types are already pre-assigned with the corresponding recording parameters. However, these can be adjusted if necessary.
Adjustments are made in the so-called recording parameter editor.
But first let’s take a look at the heart of the workflow editor:
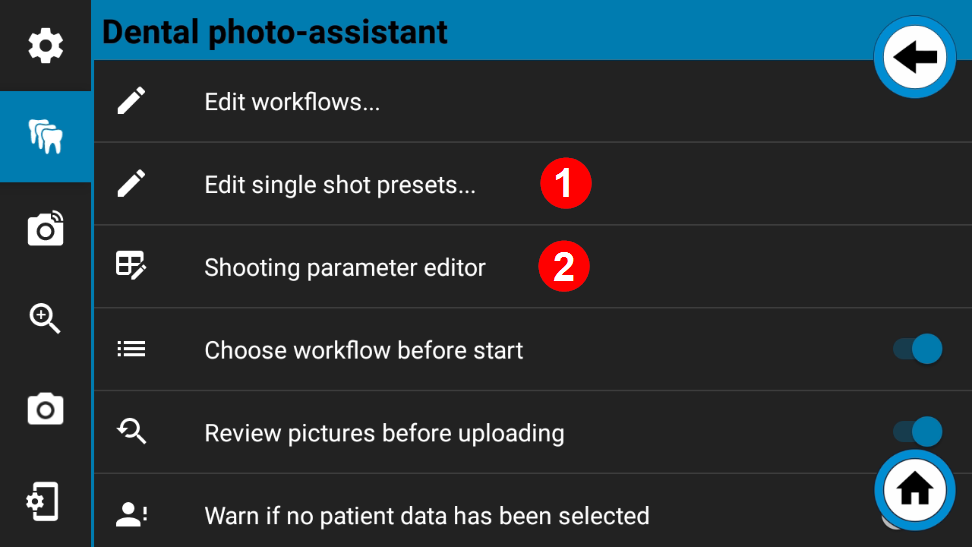
To do this, select Settings 1 via the gear wheel at the top left and then the icon with the “three teeth” 2
You are now in the settings for the “dental photo assistant”. Now select the first menu item “Edit workflows”.
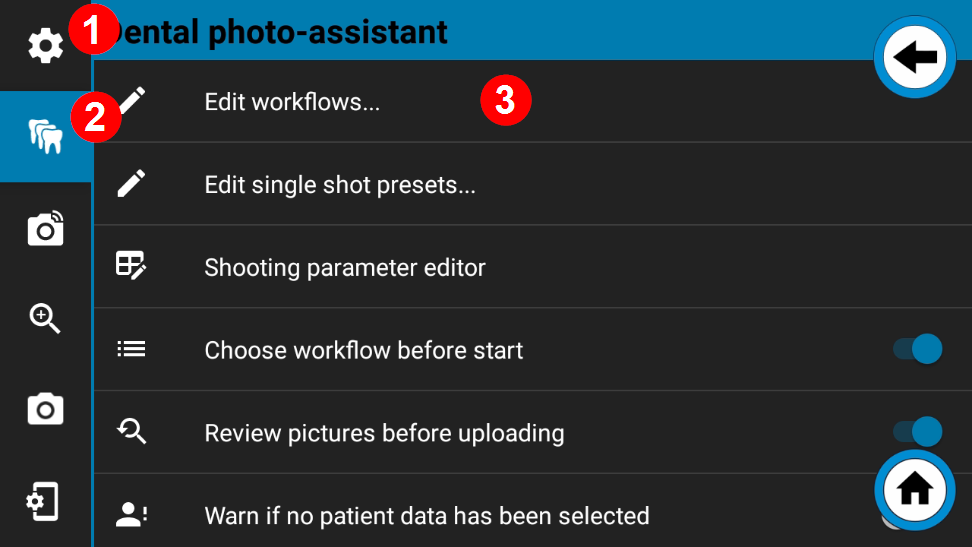
The workflow editor window opens:

You can add new workflows using the plus button at the top right of the title bar.
Any number of workflows can be created.
You can save the changes you have made using the diskette icon.
You can exit the editor by clicking on the cross in the top right-hand corner of the title bar. Attention: Changes are not saved automatically by default.
In the current view, you can see two workflows next to each other. You can select further workflows by swiping to the left. Any number of workflows can be displayed side by side.
The pencil icon in the workflow header takes you to the “Edit workflow” window:
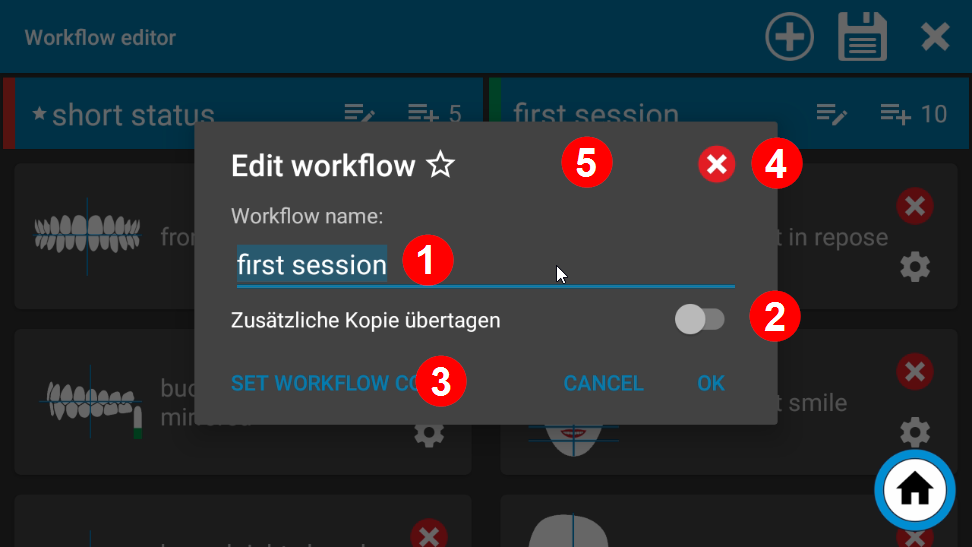
After tapping on the workflow name, the keyboard appears.
Here you can edit the name or assign a new one.
If this option “Transfer additional copy” is activated, the images of this workflow are also transferred to another directory on the PC. This can be achieved by connecting to cloud services such as “www.dentabox.de” or for upload folders for Aligner web portals.
The color of the workflow can be defined here. The color is displayed in front of the name in the workflow menu and can also be used to color code images of certain workflows such as initial findings, intermediate findings and final findings.
This can be achieved using a thin color bar on the left or right at the edge of the picture. The setting required for this can be made in the stamp menu.
See also:
Automatically color-code initial findings, intermediate findings and final findings.
The entire workflow can be deleted with the cross icon.
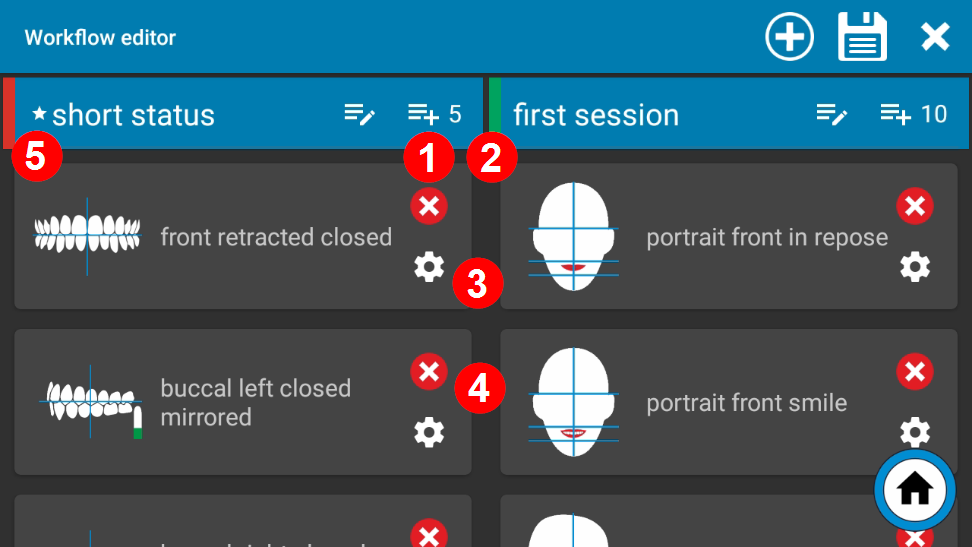
If a workflow has been declared as a favourite, an asterisk appears in front of the name. Only one workflow can be marked as a favorite. If the “Select workflow on start” option is deactivated, this workflow is started automatically when the workflow button is pressed. This is useful for practices that only work with a single workflow.
The number on the right-hand side indicates how many images are in the workflow.
Each individual picture card stands for one type of image type. All recording parameters are stored for each image card. These can be displayed using the small cogwheel at the bottom right. More on this in a moment.
You can add a new workflow with the plus icon.
You can delete the picture card from the workflow with the red cross.
Each individual image card can be moved to any position.
After making changes or before exiting the workflow editor, do not forget to “Save” using the disc icon.
The order of the workflows can be changed as required by pressing and holding in the blue header area and then dragging and dropping.
There is a cogwheel icon at the bottom right of each image card in the Workflow Editor. Tapping the cogwheel icon takes you to the recording parameter editor.
Alternatively, this can also be called up via Settings, Dental photo assistant, – Recording parameter editor.
The advantage of the first method is that the corresponding image type is already preselected when it is called up.
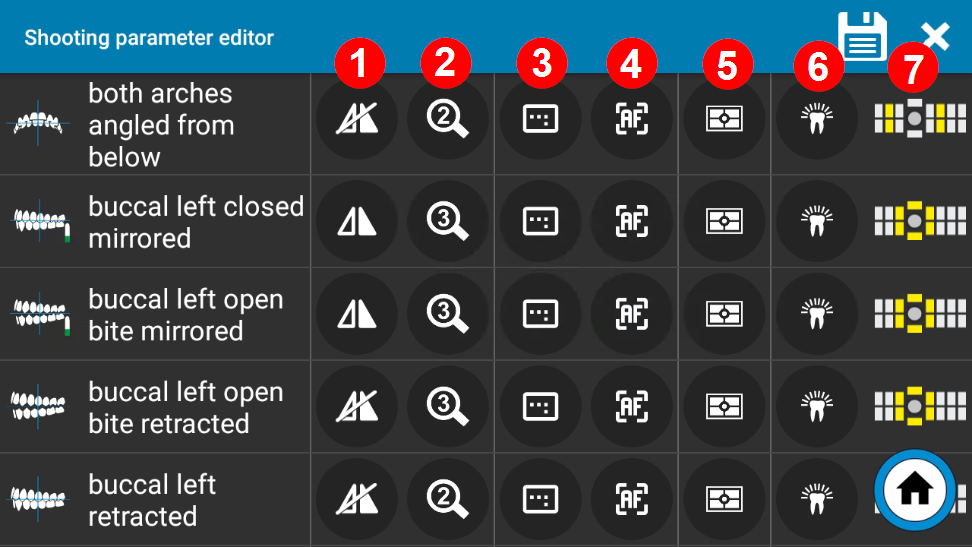
Each image card (or image type) has its own recording parameter settings.
If you want to save changes made here, you must close the recording parameter editor with the diskette icon at the top right.
Press the cross at the top right to exit the recording parameter editor without saving the changes.
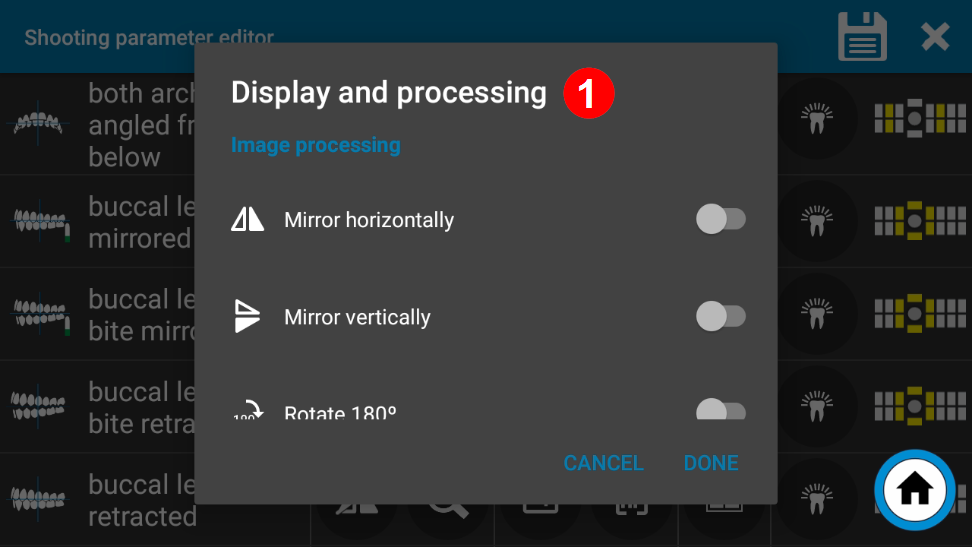
Here you can set whether the recording should be mirrored horizontally or vertically. If you want to take pictures from the 12 o’clock position, you can also set a rotation of 180°. The settings menu is divided into three areas:
Here you can define the actual image processing, i.e. whether the image should be rotated or mirrored after it has been captured.
Here you can specify how the overlay graphic should appear on the display during recording.
Here you specify which help symbol, such as a mirror or head with rotation indicator, should appear.
As a rule, all three areas should be activated equally. This is also the default setting.
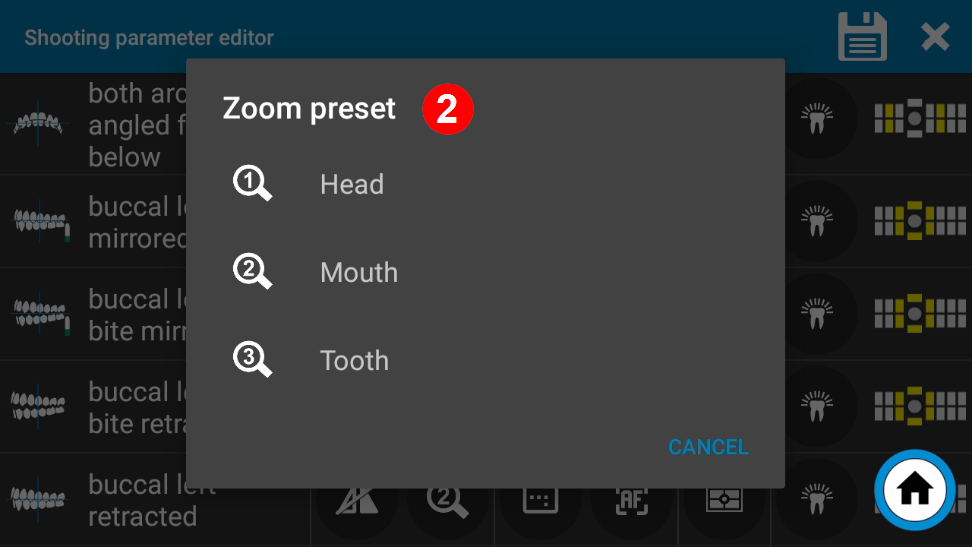
Here you can specify the zoom level or focal length at which the photo is to be taken.
The three zoom levels can be selected in the Lens settings can be defined globally.
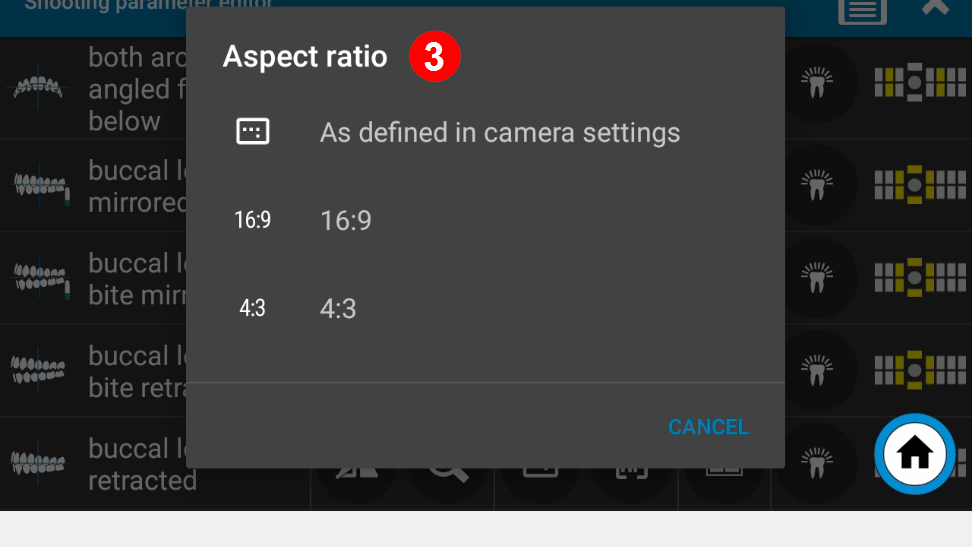
Here you can define the aspect ratio or bleed for the respective image type.
In the “Live” view before recording, the part that is later cut away is displayed darker.
By selecting a crop that matches the image type, the physical image size can be reduced, thus saving storage space.
Manual cropping can also be omitted.
The following formats are available:
4:3 (useful for occlusal overview shots)
3:2 (useful for smile and lateral intraoral exposures)
16:9 (useful for smile and lateral intraoral images)
If the “As defined in camera settings” setting is activated, the setting that is used globally for all images in the camera settings is always used for this image type: Camera settings
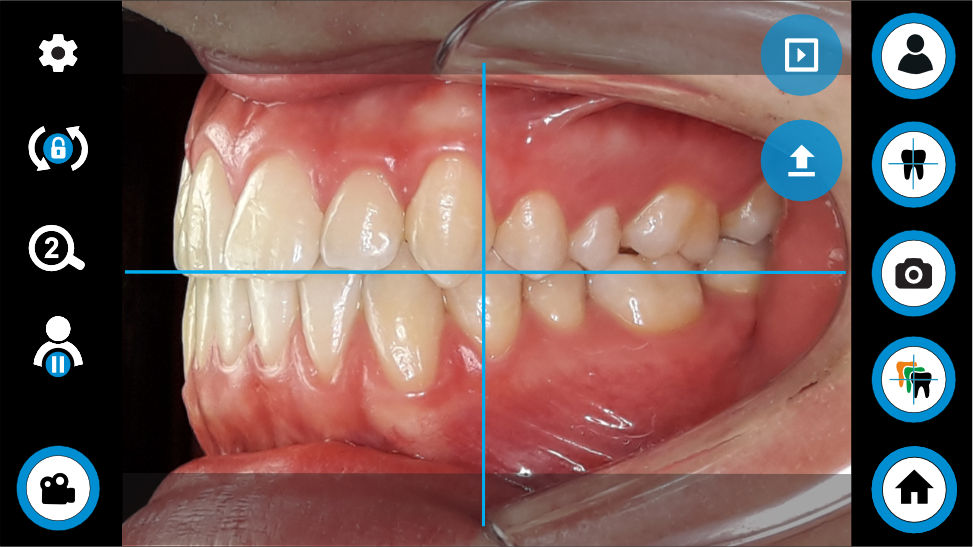
Example crop 4:3

Example crop 3:2
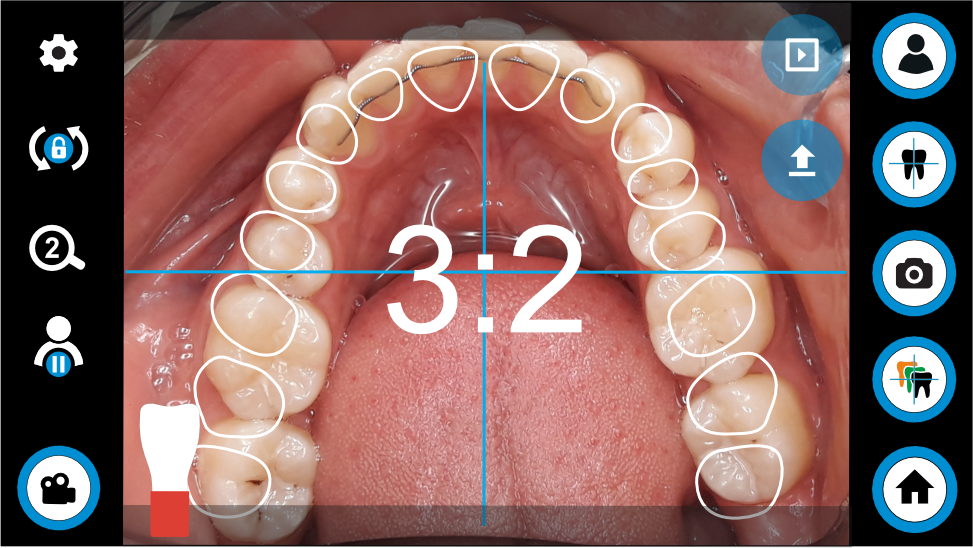
Example crop 16:9

Example crop 16:9
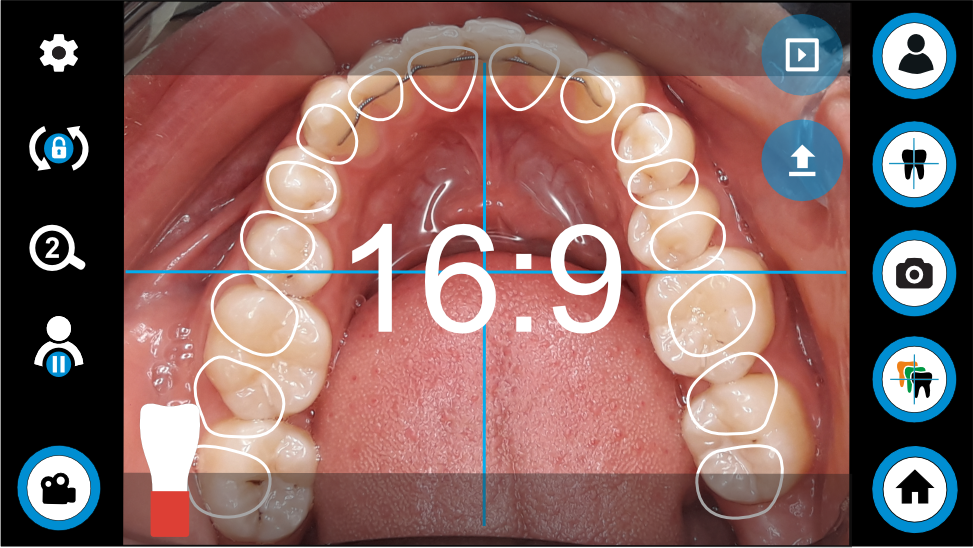
Example lateral shot with 16:9 crop
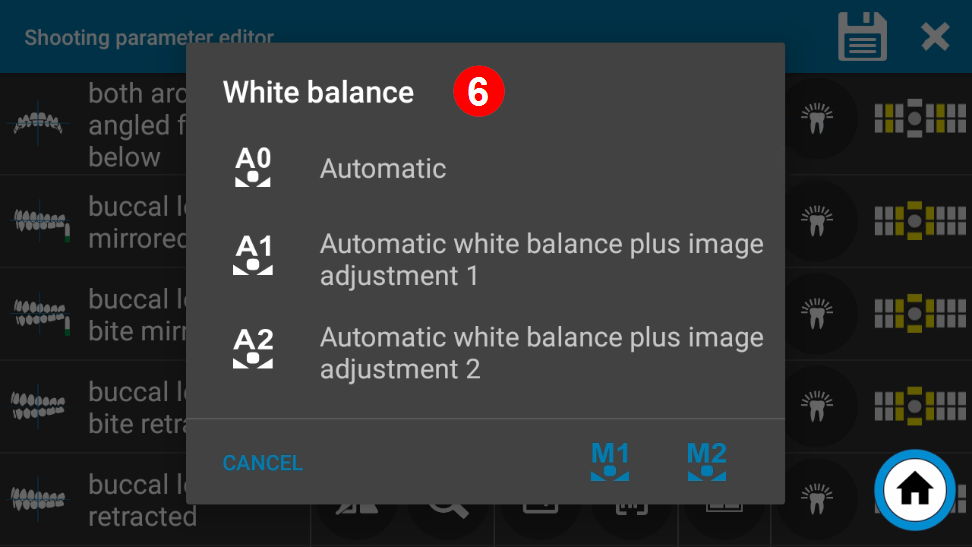
With the dentaleyepad you can use the autofocus function which automatically focuses on the right spot for each image type.
Experienced photographers for whom the autofocus sometimes takes too long can alternatively select manual focus.
Here you have the option in the Lens settings to define up to five different manual focus positions globally.
You can then assign each of these to a picture type.
For example, you can set the manual focus 3 to the maximum value of 80 (this stands for 80 cm to infinity).
You can then select this manual focus 3 for all portrait image types.
Portrait shots would then no longer be focused by autofocus, but the lens would automatically set itself to infinity.
Alternatively, you can also proceed with intraoral images. However, this always requires the same distance for each shot.
This method is only recommended if a single user or a small group of users operates the dentaleyepad.
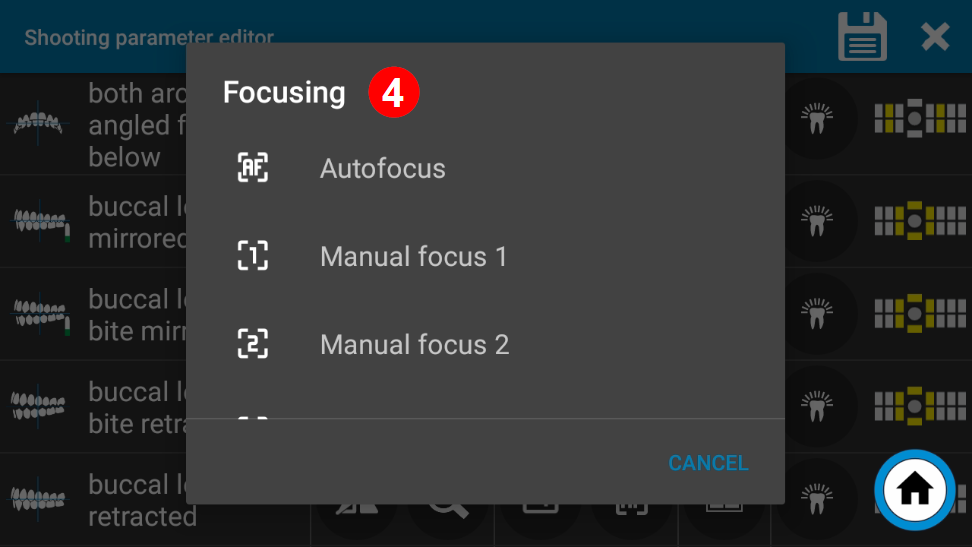
The fifth icon can be used to determine the type of exposure metering.
Here you can choose from:
- Average over the entire image
- emphasizes the middle
- Spot measurement
The “Average over the entire image” setting is recommended for normal intraoral images. This is already preset.
When taking portraits in front of a dark background, the “center emphasized” or “spot” setting can be useful to avoid the skin appearing too bright.
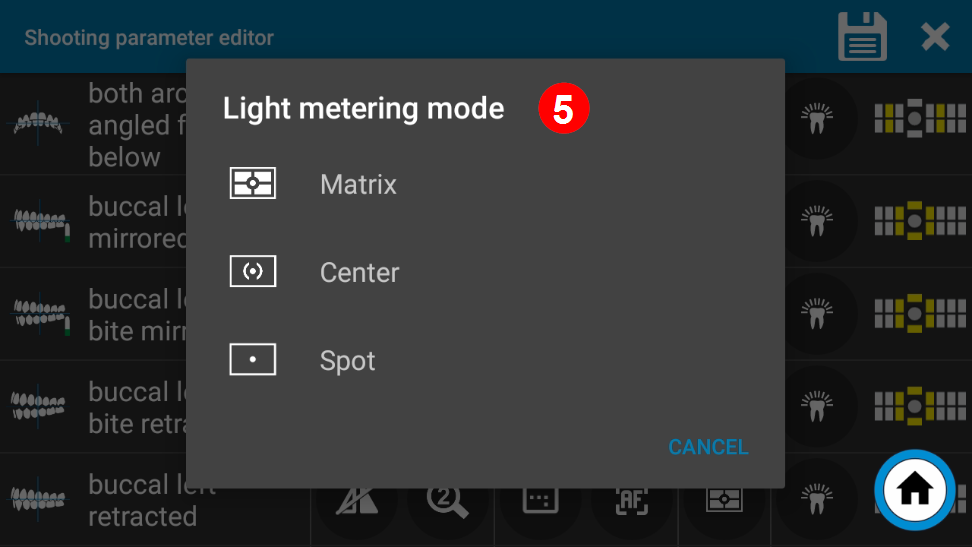
The color display or white balance can also be selected for each image card.
The dentaleye pad’s white balance ensures that colors appear natural under different lighting conditions. Different light sources, such as the dentaleyepad light or the ceiling lighting, have different color temperatures. The dentaleyepad now measures the color temperature of the light and adjusts the colors in the image accordingly, so that the color white really looks white in every image, regardless of the light source.
The white balance can be set automatically or via preset values. We differentiate here between intraoral and smile shots from a short distance and portrait or model shots from a greater distance.
intraoral images and smile images:
The dentaleyepad light is standard here. This setting is optimally matched to the light color of the dentaleyepad light and is recommended for all intraoral exposures.
Portrait and model shots:
If portrait or model shots are taken from a greater distance, the ambient brightness plays a greater role as it mixes with the dentaleyepad light.
With ambient brightness, we distinguish again between constant ambient brightness (as in rooms without or with only a small window) and changing ambient brightness, as in rooms with large windows near the recording area.
Portrait shots with changing ambient brightness:
For example, if there is a large window nearby, different lighting situations or color temperatures will occur depending on the amount of sunlight. In this case it is better to select an automatic white balance. Although this is not as precise, it prevents the otherwise significant color deviations in the images.
If the images from the automatic white balance appear too cool, you can alternatively select the setting “Automatic plus image adjustment 1” or “Automatic plus image adjustment 2”.
Here you have the option of using an image processor to influence the color temperature of the image calculated by the automatic white balance. For example, you can set the value of image processor 1 to “+2”.
The settings for both image processors 1 and 2 can be found in the camera settings under the settings for manual white balance.
Portrait shots with constant ambient brightness:
If the room has no or only small windows and the lighting is always the same, manual white balance with the default setting of artificial light 3 (light bulb icon with a 3) or artificial light 4 (icon with neon tube) is recommended.
If the default settings do not optimally match the color temperature of the light in your practice or the images appear too warm or too cold, there is also the option of a manual white balance with adjusted parameters.
To do this, switch to the camera settings and select the menu item “Manual white balance 1” or “Manual white balance 2”
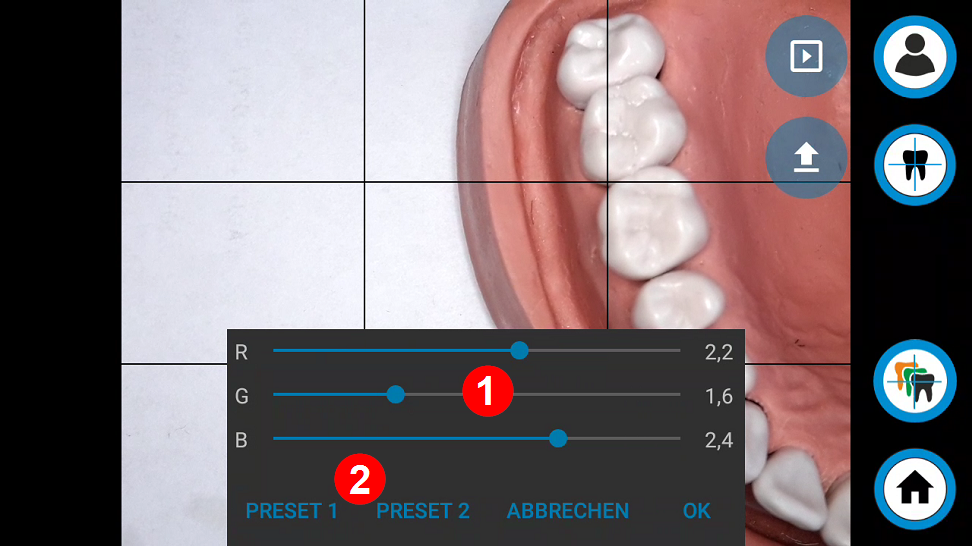
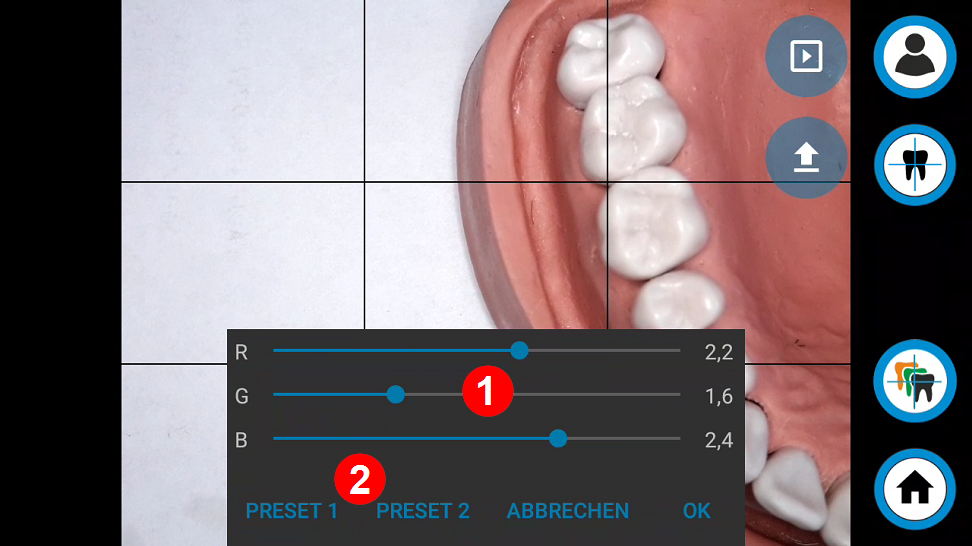
Point the dentaleyepad at a neutral white surface and change the
for the values red, green and blue until the live image matches your expectations of the white tone.
We have provided two presets (2) that you can use as a guide. Press the Ok button to accept the setting and save it to the respective manual white balance.
In order to obtain optimally illuminated images, a separate lighting scenario is available for each image type.
All scenarios are already predefined for you in the intraoral exposure types.
As the intraoral lighting situation is generally independent of the ambient light, no adjustments need to be made here.
For portrait shots, however, adjustments can make sense due to the ambient light and the distance to the patient.
The default setting for portrait shots is “Portrait”. This emits a maximum amount of light and is intended for darker rooms.
If there is sufficient light in the room or patients feel dazzled, one of the frontal settings 1 to 6 may also be sufficient.
If the room is very bright or there is enough light from the front onto the face, the lighting can also be switched off completely.
You can use the “Light off” scenario for this.
To make it easier for you to change the settings for the portrait image types, you will be asked each time you make a change whether this should be applied to all portrait image types. Here you can confirm with “yes “.
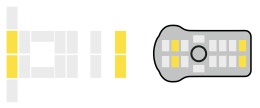 frontal 1 frontal 1 | 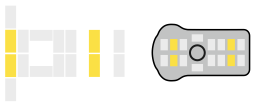 frontal 2 frontal 2 | 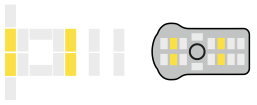 frontal 3 frontal 3 | 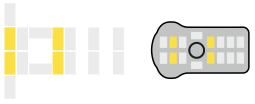 frontal 4 frontal 4 |
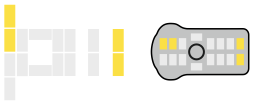 frontal 5 frontal 5 | 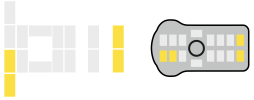 frontal 6 frontal 6 | 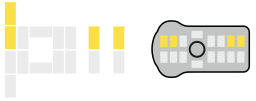 top 1 top 1 | 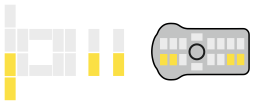 below 1 below 1 |
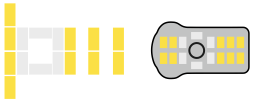 Portrait Portrait | 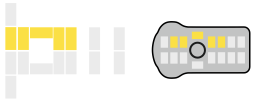 top 2 top 2 | 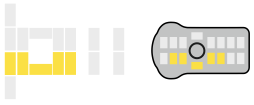 below 2 below 2 |  lateral right lateral right |
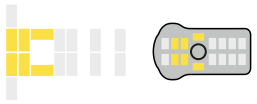 lateral left lateral left | 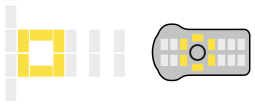 Ring light Ring light | 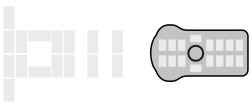 Light off: for example for photographing X-ray images Light off: for example for photographing X-ray images |
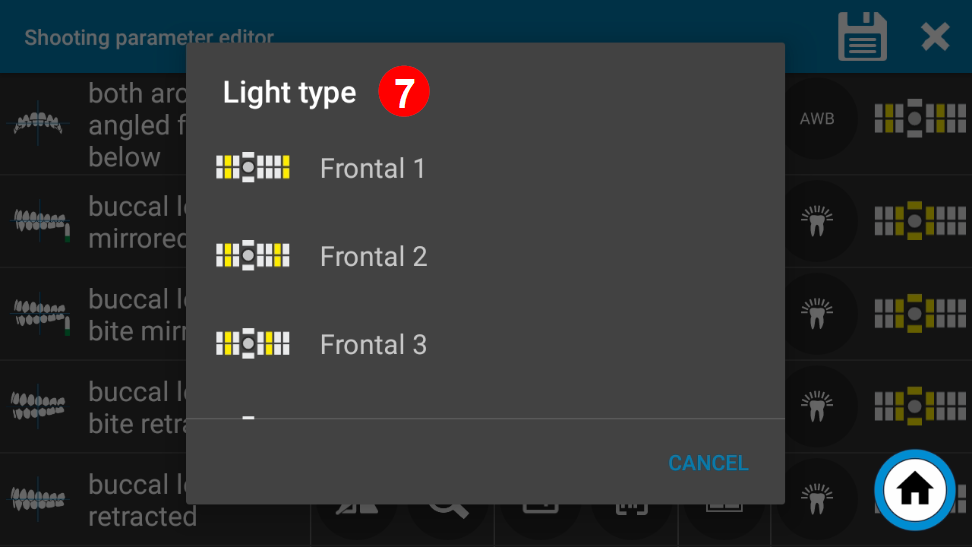
If this option is activated, the selection of available workflows appears when the workflow button is pressed.
If this option is deactivated, the workflow marked as a favorite starts immediately when the workflow button is pressed.
See also:
Defining a workflow as a favorite
If this function is activated, a control image of each recording is displayed. Only when this is confirmed with the green button will the transfer take place.
The same function is also available in the Camera installations area. There, however, it only refers to free recordings without workflow or single shot overlay insertion.
Warn if recording without patient data (switch on recommendation)
If this option is activated, a warning message appears before the recording is triggered if no patient data is shown on the display beforehand.
If you use a software interface with the dentaleyepad that includes the transfer of patient information, we recommend activating this option.
This avoids accidentally creating recordings without patient reference.
See also control image view
If this option is active, the workflow marked as a favorite starts automatically after the patient data has been transferred.
For programs that transfer the workflow information as well as the patient data, the desired workflow always starts automatically, even if this option is not active.
If this option is active, the patient transfer is also started immediately when the Camera app is started. This works for the following transfer methods:
Start QR Code Scanner
Start OCR scanner
Start manual entry of the patient number
Automatic reading of the info file in the background
If the pause assistant is active, you can interrupt work in the middle of a workflow and even switch off the dentaleyepad. As soon as you switch it on again or start the camera app, a window appears asking whether you want to continue the interrupted photo session or start a new session with a new patient.
Note: from version 308, the pause assistant is compatible with the “Start patient input at camera start” function.
If automatically optimized image cropping is activated, the image is cropped automatically depending on the respective image type. The cropping area is already marked in the live image by a corresponding darkening. This function sometimes saves subsequent editing and reduces the file size during recording. However, it is not recommended for beginners, as you have to determine the image section very precisely while taking the picture.
When the dentaleyepad is switched on via the main switch, the camera app also starts automatically. This option is not recommended as you may miss notifications on the home screen.
The dentaleyepad offers the option of preventing the display from rotating by means of a rotation lock when taking “overhead shots”, for example. By default, this function is reset when the camera app is restarted. If this option is activated, the setting is retained even after restarting the camera app.
Experimental function in beta phase
If this function is activated, an attempt is made to automatically crop the portrait when taking portrait shots.
You can freely choose the background color. The cropping works very well with some backgrounds, but with other, mostly homogeneous backgrounds, the cropping may still be incorrect.
Start the connection settings via the gear wheel at the top left and then select the camera icon with the WLAN symbol

The following menu options now appear:
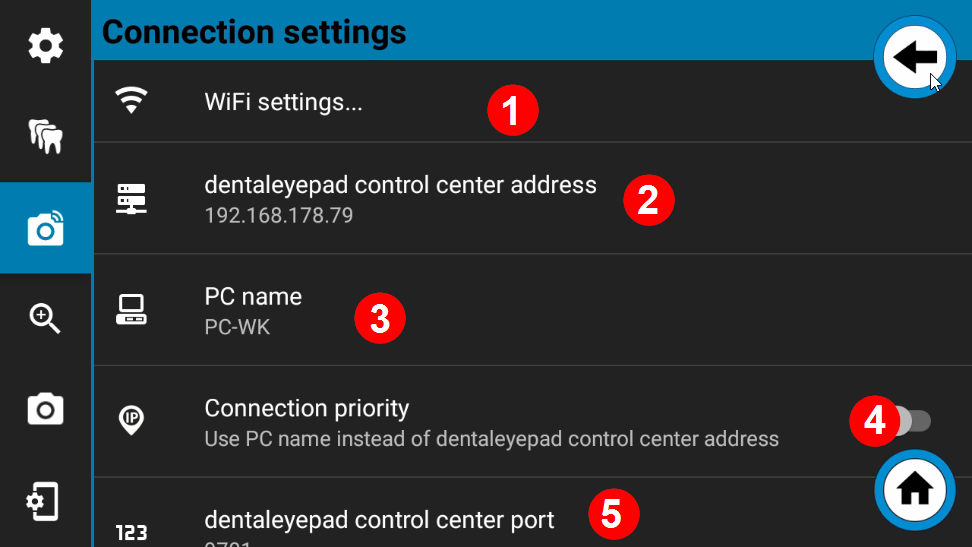
When you call up the WLAN settings item, a window appears in which all available networks are listed. Select your practice network here. Please note, that the dentaleyepad does not work in a guest network.
The IP address of the PC on which the dentaleyepad control center is installed is displayed in the menu item “dentaleyepad control center address”.
The value was automatically adopted when the QR code was scanned during setup.
If you want to make a manual change here, you can simply tap on the entry and edit it.
The name of the PC on which the dentaleyepad control center is installed is displayed here.
Use PC name instead of dentaleyepad control center address
If your network supports this, you can also use the PC name to connect to the dentaleyepad control center. This has the advantage that the connection will continue to work if the PC does not have a fixed IP and is assigned a new IP address (after a longer break, e.g. vacation).
The “dentaleyepad control center Port” is displayed here. As a rule, port 9701 is correct here. In Multi mode, a different value can also be entered here. By tapping on
the entry, the value can also be changed manually if necessary.

The “Transfer photos automatically” function must be active for the photos to be transferred automatically after they have been taken.
If the “Delete after transfer” function is activated, all images are deleted from the dentaleyepad after successful transfer to the PC. The deletion only takes place after a positive response from the PC so that no images can be lost. If you want to show images directly on the dentaleyepad to the patient, this function must not be activated.
If the “Check target directory before transfer” function is activated, the target directory on the PC is checked before the transfer. Are there pictures available,
a corresponding message is displayed on the dentaleyepad. This function makes sense for programs without patient data transfer or for auto-import folders.
This ensures that all transmitted images can be precisely assigned to a patient.
The “Optional transfer button” function can be used to always save a copy of the images that are transferred to a second directory. save. One use case would be, for example, if you always want to create a backup or cloud copy of photos of a particular dentaleyepad.
Alternatively This function can also only be assigned to a single workflow. See Option Transfer additional copy.
In this case, deactivate the function here and activate the “Transfer additional copy” function directly in the workflow properties instead.
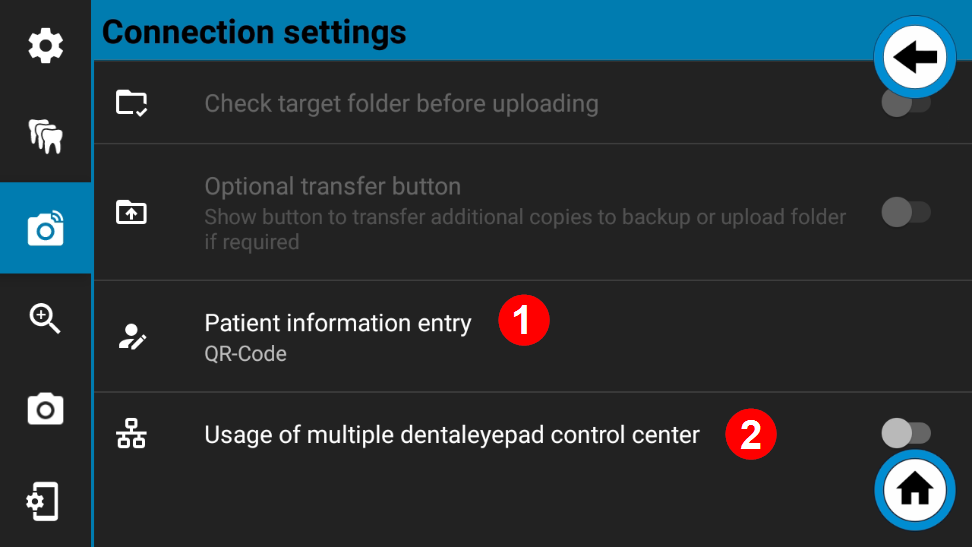
The method with which the patient data is recorded by the dentaleyepad can be set here. The respective methods depend on the activated interface. There are basically the following methods:
Transfer of information by scanning a QR code
Scanning the information from the software screen using an OCR scanner
Manual entry of the patient number
Manual entry of the patient’s name
Automatic reading of an info file
Multi-operation multiple dentaleyepad control center
This option offers possible solutions for various special applications: Two examples are explained below:
Example 1 Different interfaces
Different software interfaces are to be addressed on a dentaleyepad. For example, it may be that only one dentaleyepad but two different software products are used in a group practice.
In this case, two dentaleyepad control centers must be installed and licensed.
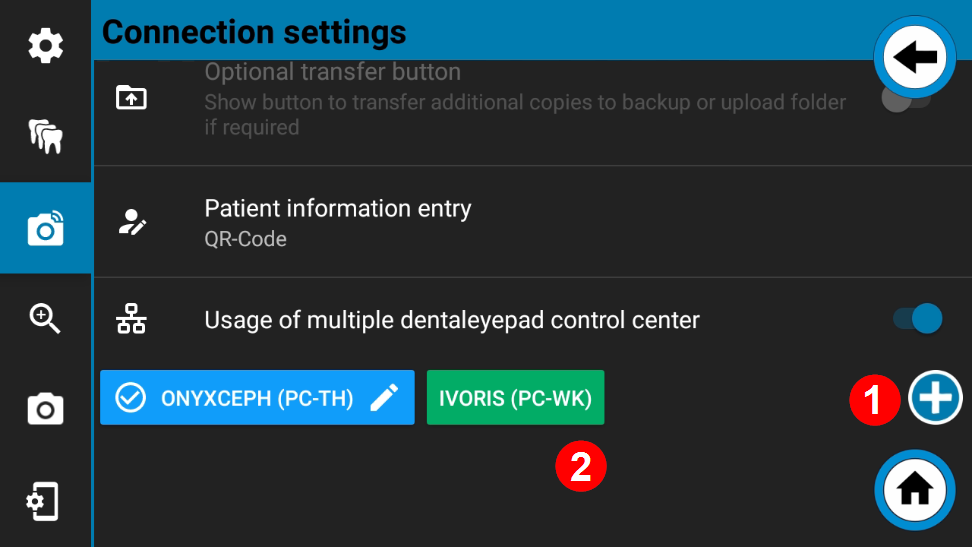
The “Multi mode” option must be activated on the dentaleyepad. Another button bar appears, usually with one button. Another button can now be added using the plus button 1.
When the button is active, a pencil icon 2 appears behind the name. This can be used to edit the button. A button can now be labeled for each software and, if desired, the color can be freely selected.
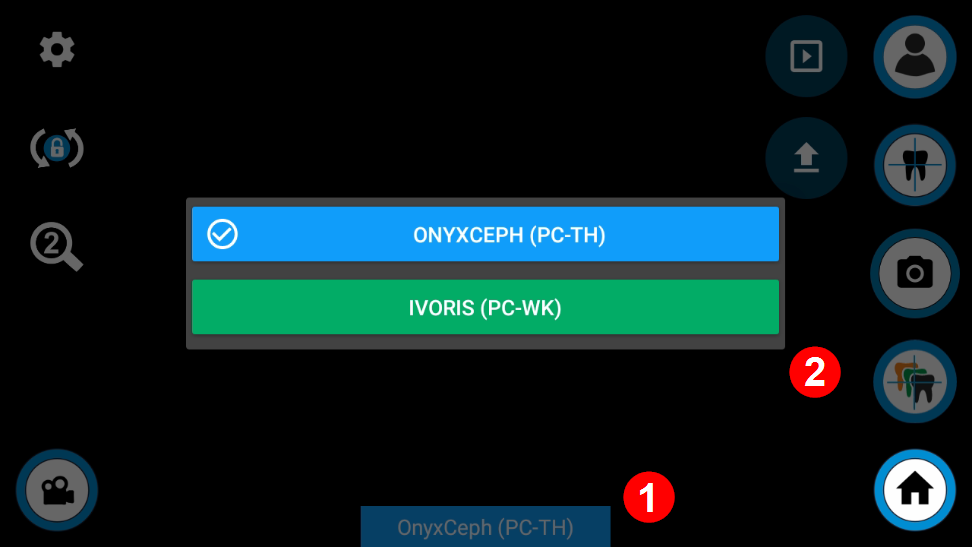
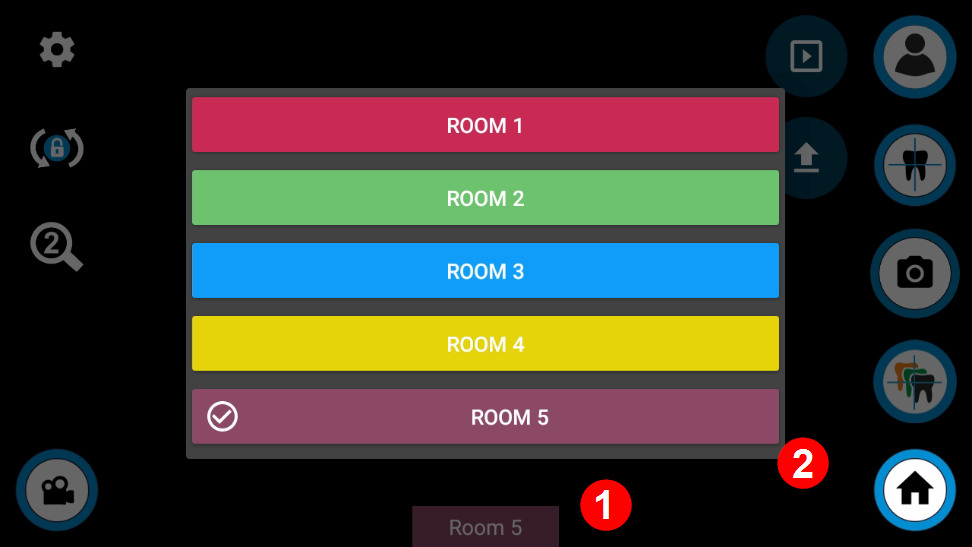
You can now exit the settings menu using the cogwheel at the top left. In the normal camera live view, the active interface now always appears at the bottom center. The interface can be changed simply by tapping the respective button on the edge of the screen.
The interfaces still need to be connected before first use.
Now go to the PC on which the first software (in our example OnyxCeph) is set up and open the dentaleyepad control center (tab “dentaleyepad settings”).
Scan the QR code there by pressing and holding the patient button at the top right.
When the message “The settings have been accepted” appears, the first interface has been set up.
Then select the second interface on the dentaleyepad (in our example Ivoris) and go to the PC on which the second interface is set up. Open the dentaleyepad control center and scan the QR code here as well.
When the message “The settings have been accepted” appears here too, the setup is complete.
You can now select the interface before each photo session by simply tapping on it.
Several dentaleyepads are used in one practice. However, the software interface does not support automatic assignment via patient ID, but only an autoimport function, for example, in which the images are imported for the current patient.
A dentaleyepad control center can be installed on each workstation from which photographs are to be taken in order to obtain a 100% reliable assignment.
The “Multi mode” option must be activated on the dentaleyepad. Another button bar appears, usually with one button.
Another button can now be added using the plus button 1.
When the button is active, a pencil icon appears behind the name 2.
This can be used to edit the button. A button can now be labeled for each workstation and, if desired, the color can be freely selected. The labeling can be done according to PC name or room number, for example.
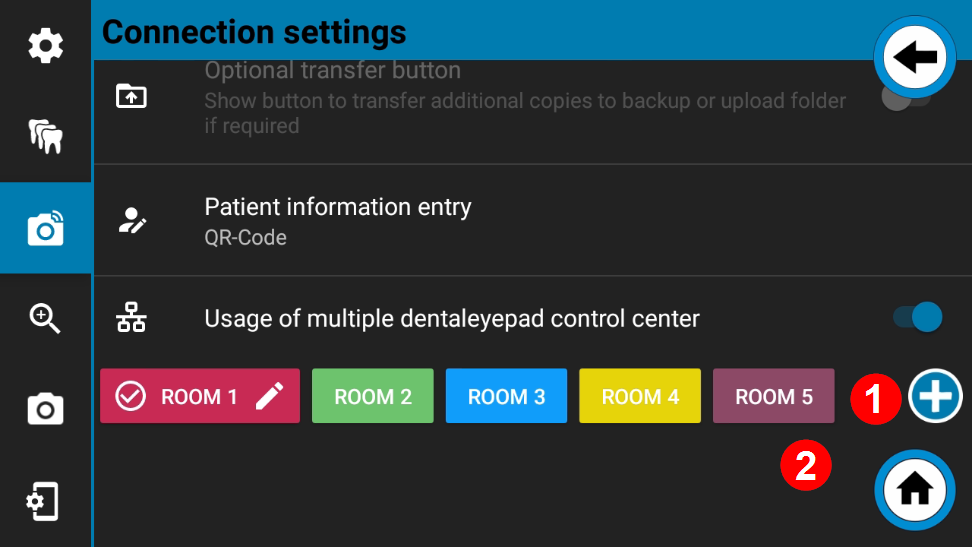
You can now exit the settings menu using the cogwheel at the top left. In the normal camera live view, the active PC or room now always appears at the bottom center. The recording location can be changed simply by tapping the respective button on the edge of the screen (1 and 2)
The workstations still need to be connected before they can be used for the first time.
Now go to the first room or PC and open the dentaleyepad control center (tab “dentaleyepad settings”).
Scan the QR code there by pressing and holding the patient button at the top right.
When the message “The settings have been accepted” appears, the first workstation has been set up.
Then select the second workstation on the dentaleyepad (Room 2 in our example) and go to the second PC. Open the dentaleyepad control center and scan the QR code here as well.
If the message “The settings have been accepted” appears here too, the second workstation has also been set up.
Proceed accordingly with the other workstations.
If you now select the relevant workstation by tapping on it before each photo session, the images will only be transferred to the relevant PC.
In this area, you can define three global zoom values and five global manual focus values.
You can select these in the recording parameter editor to define the zoom range or the manual focus distance for each image type.
See also: Setting the magnification

The dentaleyepad 3 should have ain value above 90 einin order to avoid distortions in portraits (large nose, blurredinears) in portraits
For smile shots from a short distance sind values in the range 50 to 70 are suitable.
For the detailarea can bea value above 100 can be suitablein. Concerns You however, that with the dentaleyepad 3 ein digital zoom to theinis used. This means that the higher the magnification, the poorer the absolute resolution.
The manual focus menus 1 to 5 allow you to set a value in centimeters. If you do not want to work with autofocus, you can assign it to an image type. This option saves time when taking photos, but requires a constant distance per image type.
See also Focusing 4
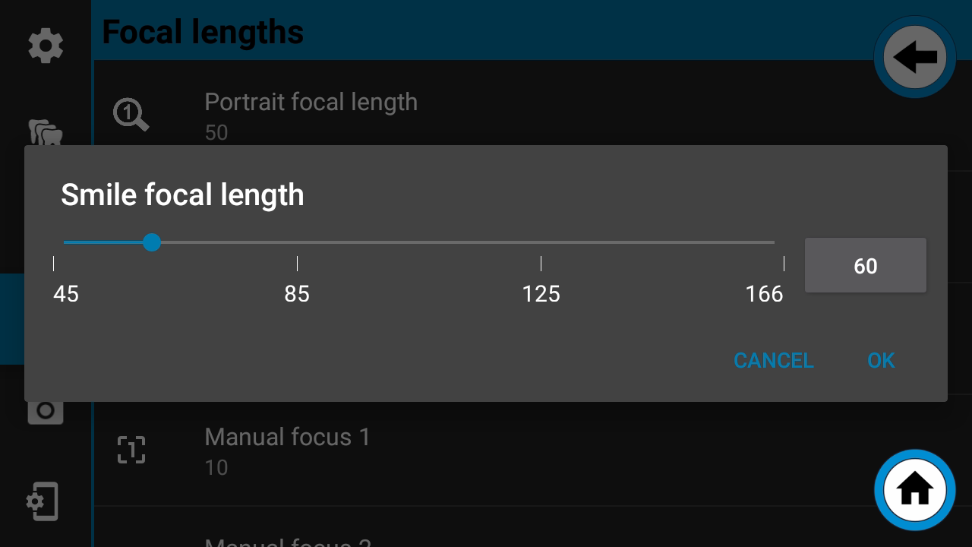
Example E in setting of the Smile focal length:
The slider can be used to change the value of the focal length (zoom value) e in be set.
The following options relate directly to the image or the triggering process.

In the Image resolution Image resolution, the resolution or aspect ratio can be set globally for all recordings.incan be set globally for all recordings.
If you in the recording parameter editorinthe image type ein the value from the camera Einsettings is not taken into account.
If you in the recording parameter editor einimage type the property “As in Camera Einpositions definThis value is adopted when you assign the camera to the “Def ined” setting.
Here you can specify how much image compression should be applied.
Strong compression reduces the file size but also the image quality. We recommend leaving the setting at 100 (Best).
In the control screen display can You decide for each image whether the recording is to beinstamp should be affixed. When They generally all pictures with ainstamp on all images, can You can activate this here. Contentstop and appearanceinof the stamp are displayed via the stamp icon in the the control screen display.
If this function is activated, the camera focuses again at the point specified for the image type immediately after the shutter release.
If this function is not activated, the value of the permanent autofocus is adopted. This is usually a little faster.
If this function is activated, a control image of each recording is displayed. Only when this is confirmed with the green button will the transfer take place.
The same function is also available in the dental photo assistant area. However, it only refers to recordings in the workflow. The setting here refers to recordings outside of a workflow or “single shot” recordings.

If this option is activated, aan acoustic signal is always emitted when focusing is successful.
The dentaleyepad has a continuous shooting function that automatically takes pictures with different lighting scenarios when the shutter release button is pressed and held. For example, smile images with different reflections on the tooth surface can be created. The maximum number of recordings is 11.
If this function is activated, the lighting scenario is not changed after the recordings and all recordings are made with the same lighting scenario.
This has the advantage of a faster (almost twice as fast) image sequence.
The resolution of the preview image can be set here. You have a choice of 5 quality levels:
100 (Best)
95 (very good)
90 (good)
85 (Normal)
75 (draft)
We recommend the default value of 100.
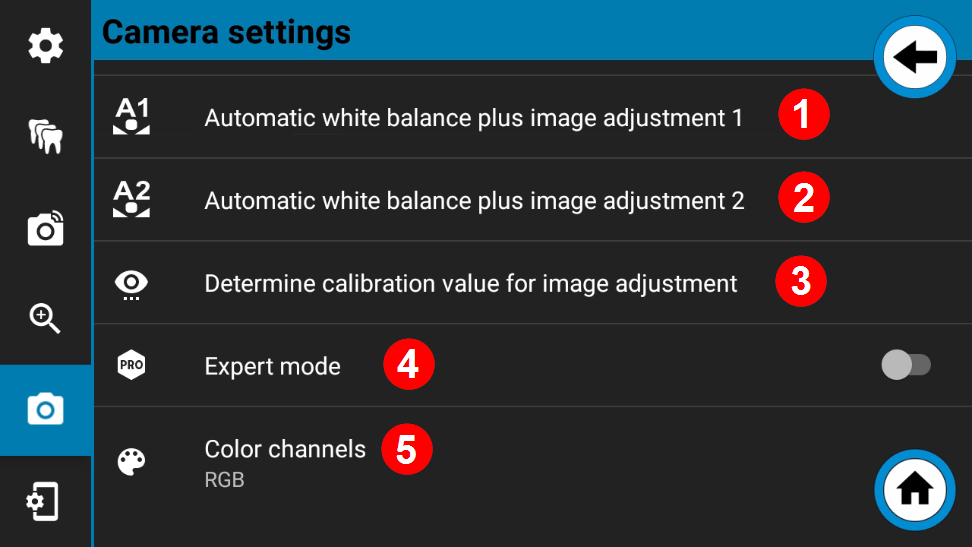
The manual white balance is used to display the colors in your pictures as close to reality as possible.
If you tap M1 or M2 two, you will get the live view below, with additional setting controls displayed.
Select an image section that contains a neutral white. For example, a model on a white sheet of paper.
You can now change the sliders for red, green and blue until the desired color value is achieved.
For orientation purposes, two settings (PRESET 1 and PRESET 2) are provided as examples, which you can call up by tapping on them.
Press the OK button to save the current setting. Press CANCEL to exit the menu without saving any changes.
See also: Color display (white balance) 6
As already mentioned in the section:
Color display (white balance)
described above, it is also possible toinautomatic white balance with ainto edit the image adjustment afterwards. Here can You to set the value of the image adjustment. To determine the value as efficiently as possible can You the following function:
Determine calibration value for image adjustment (3) use.
This option allows you to create an automatic photo series with different settings. All photos are transferred and the corresponding parameters are stamped directly into the image. This allows you to view and evaluate the images on your workstation screen. You can then transfer the parameters of the most suitable image to the dentaleyepad.
Please use a test person at the original location in your practice for the test series. Also use the original lighting that you want to work with later.
For special cases and tests sind here even more advanced functions and Einsetting options hinted. These sind for the normal use of allings is not required. We recommend leaving the expert mode switched off.
Here you can switch between RGB color mode and luminance mode (black and white display).
This option is important when photographing X-ray images.
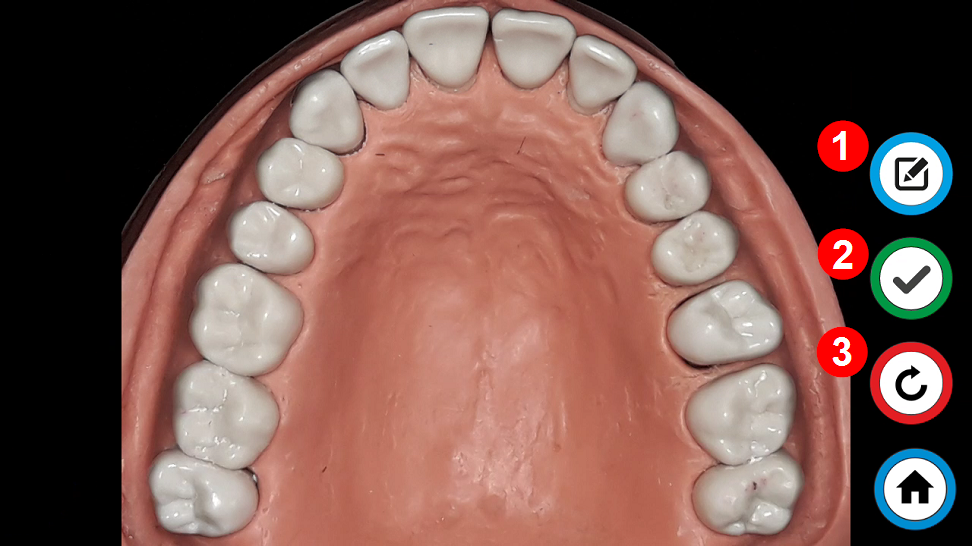
If the control image function is active, the recording is saved before it is shown again on the display before it is transmitted.
Here you have you the possibility to edit the recording edit 1 or them by pressing the trigger on the housing or the green tick on the display. The transfer will then follow immediately. Alternative can You can repeat the recording. In this case, press press the Repeat button on the housing or display 3.
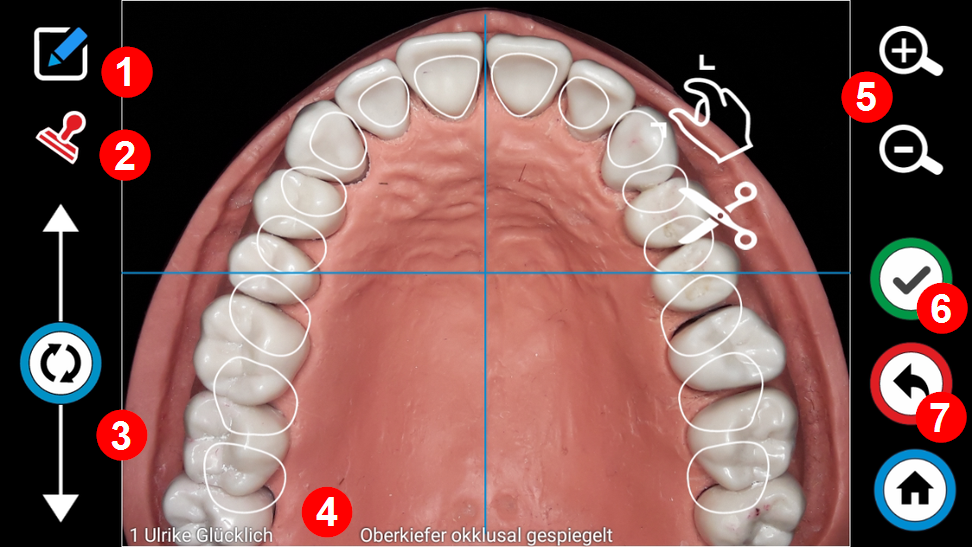
In the Edit view, you have the option of using the pencil icon (1) to access the Draw view if you want to make markings in the image, for example.
You can switch the stamp function on and off using the stamp icon (2). By dragging the rotation button (3), you can correct the alignment of the image if necessary.
If the stamp function is switched on, the stamp is already displayed here as shown in example (4).
You can change the image section using the plus and minus buttons (5).
Once you have finished editing, you can switch back to the control image view using the release button on the housing or the green confirmation button (6) on the display.

In the drawing view, you can select the pen color (1) at the top left. Simply draw with your finger. For more precise positioning, you can zoom in on the relevant region before drawing using the two-finger zoom gesture (3). Alternatively, you can also change the image section using the plus and minus buttons.
If you want to delete the last marker or line, tap the left arrow button (5) on the bottom left-hand side.
If you want to restore a deleted marker or line, simply tap the arrow pointing to the right.
If you want to save the drawing or the markings, exit the drawing view with the green release button on the housing or with the green confirmation button on the display.
If you want to exit the drawing view without saving, press the red Discard button (7).
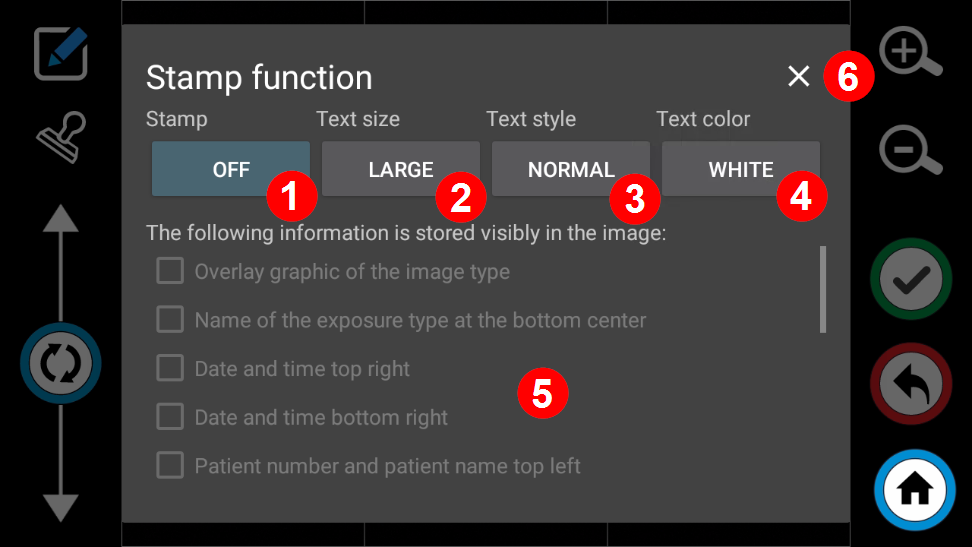
You can use the first switch (1) to switch the stamp function for the current image on and off.
The second button (2) can be used to select the text size. Here you can choose between “Large” and “Small”.
The text style can be selected with the third button. Shadow”, “Label”, “Normal” and “Outline” are available here.
With the fourth button (4) you can select the text color “White” or “Black”.
The following stamps can be activated: (multiple selection is possible)
Overlay graphic of the recording type
Designation of the mounting type bottom center
Date and time top right
Date and time bottom right
Patient number and patient name top left
Patient number and patient name bottom left
Practice name top right (Practice name Title First name Last name)
Practice name bottom right (Practice name Title First name Last name)
Workflowname bottom left
Color bar (color of the workflow) on the left
Color bar (color of the workflow) on the right
All details (admission type, date, patient ID, patient first name, patient last name, practice name title first name last name workflowname) top left
All details (admission type, date, patient ID, patient first name, patient last name, practice name title first name last name workflowname) top right
All details (admission type, date, patient ID, patient first name, patient last name, practice name title first name last name workflowname) bottom left
All details (admission type, date, patient ID, patient first name, patient last name, practice name title first name last name workflowname) at the bottom right
The following options are activated in this example:
All details (admission type, date, patient ID, patient first name, patient last name, practice name title first name last name workflowname) top left (1)
Patient number and patient name bottom left (2)
Designation of the mounting type bottom center (3)
Practice name bottom right (Practice name Title First name Last name) (4)
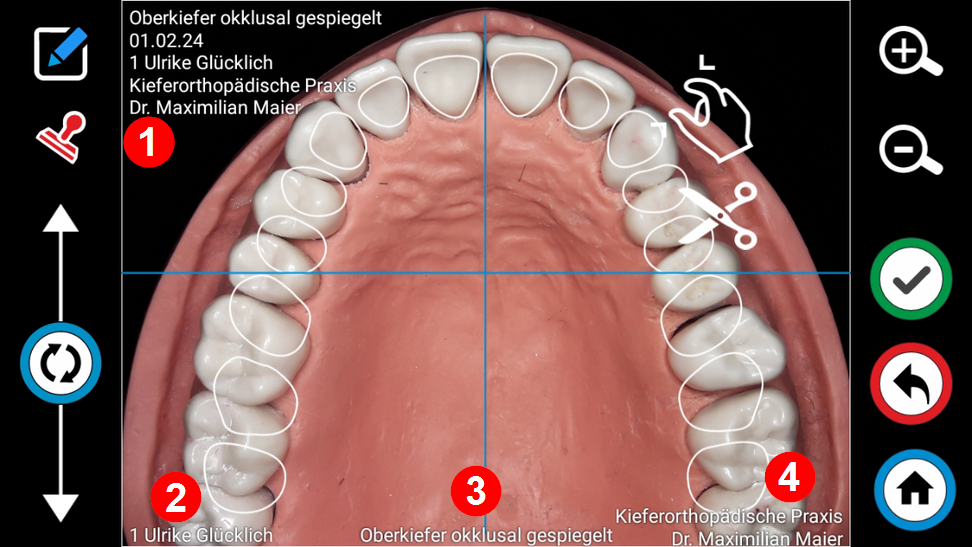

As text style we recommend “SCHATTEN” or “LABEL” to ensure good legibility regardless of the background.
Please note that the font in the original image is still stilllarge enough and easy to read.
In the Gallery app, you can get an overview of all images of a day, a week or a patient.
The prerequisite for this is that you have deactivated the option “Delete images after transfer” in the connection settings.
You can view individual images in the gallery:
rename,
print,
by e-mail,
edit,
or manually transferred to a cloud storage.
To view images of a specific patient, for example, you can use the search function with the magnifying glass (1).
Enter the name or patient ID here.
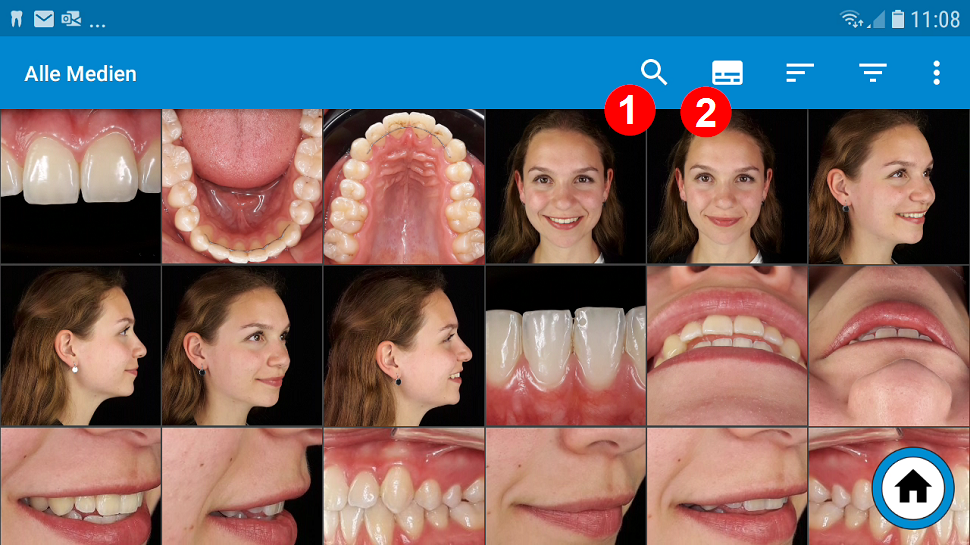
You can use the label icon (2) to display the file name and thus the patient ID or the patient name.
The result looks like this:
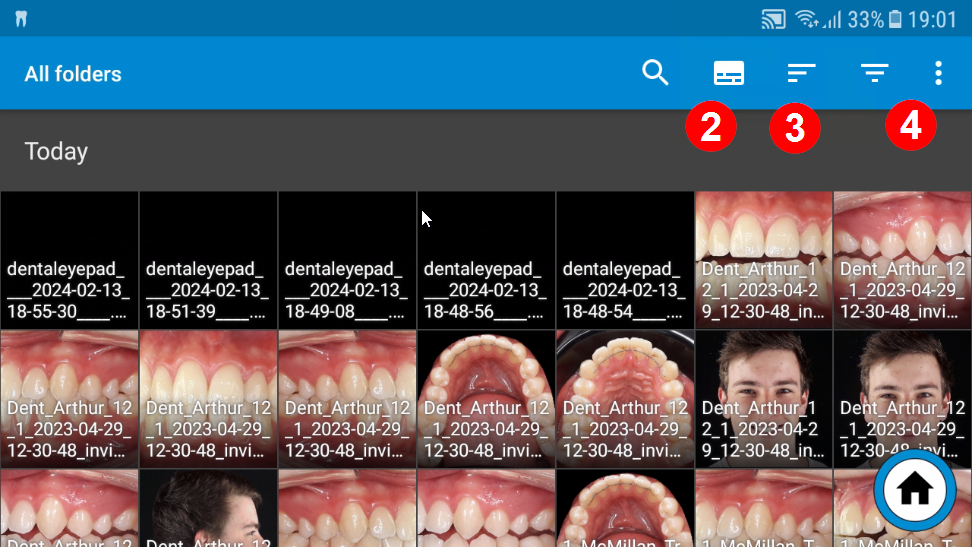
This is only a temporary insertion. The images themselves, in contrast to the stamp function, are not changed.
With the sort icon you can sort the images sort according to various criteria. We recommend the “Recording date” setting so that you always see the most recent recordings first.

You have various options in the “three dots” menu item 4.
On the one hand, you can switch from tile view to line view using the “Change display” menu item.
In the line view, you will see the complete file name next to the image.

You will also find the menu item “Change tiles” in the “three dots” menu.reducetiles” and “Enlarge tiles”. Here you can the number of imagesthat are shown on the display at the same time.
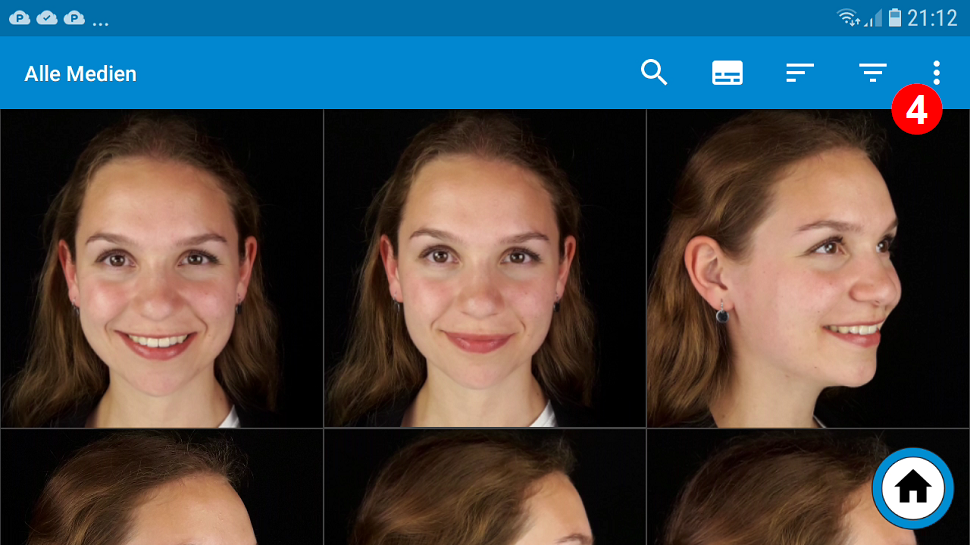
Alternatively you can you can also use the “two finger zoom gesture”, i.e. “fromaway from each other” or “move towards each other” of thumb and index finger, change the image size.
You will also find the menu item “Change tiles” in the “three dots” menu.reducetiles” and “Enlarge tiles”. Here you can the number of imagesthat are shown on the display at the same time.
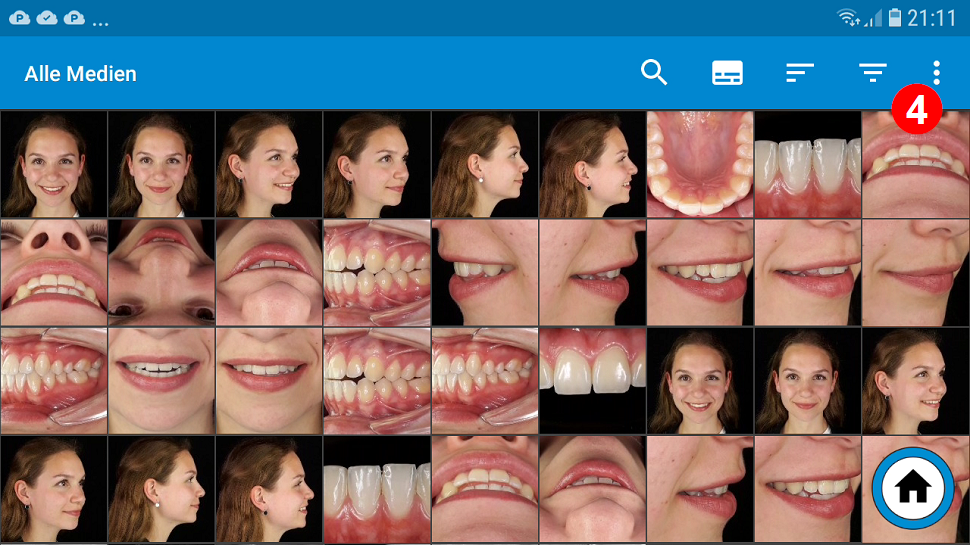
You can mark a single image by pointing your finger at it and holding it there for a short time. A marked image can be recognized by the blue arrow at the top right of the image.
If several images are to be marked at once, simply “swipe” to the next images after the first marking. This works both horizontally and vertically. When swiping vertically, complete lines are marked directly.
Once you have selected the desired images, you can:
Transfer manually
Edit subsequently
send by mail
Normally, this function is not necessary. If you have activated “Transfer photos automatically” in the connection settings and something goes wrong during the transfer, these images will also remain in a queue until the transfer was successful. If images were not transferred due to a Wi-Fi problem, this is indicated by a red transfer arrow.
In this case, please tap directly on the red arrow to restart the transfer of the images. Only the images that have not yet made it to the PC are transferred.
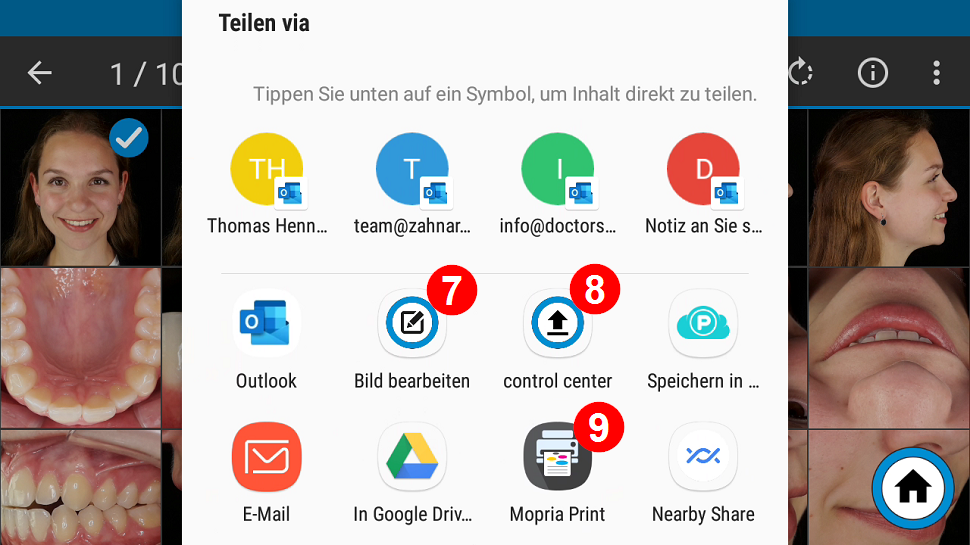
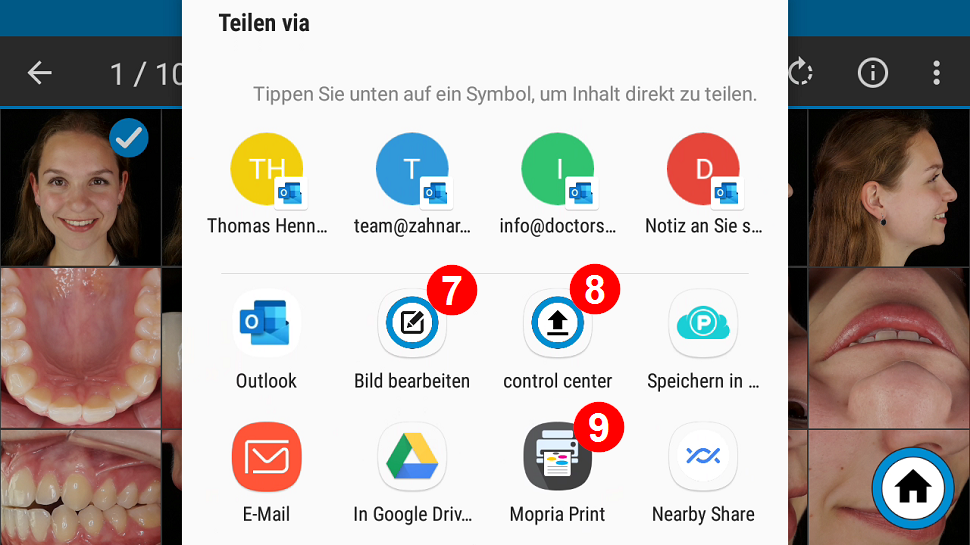
If you want to transfer the images manually for another reason, simply tap on the share icon and then on “control center” in the following window 8
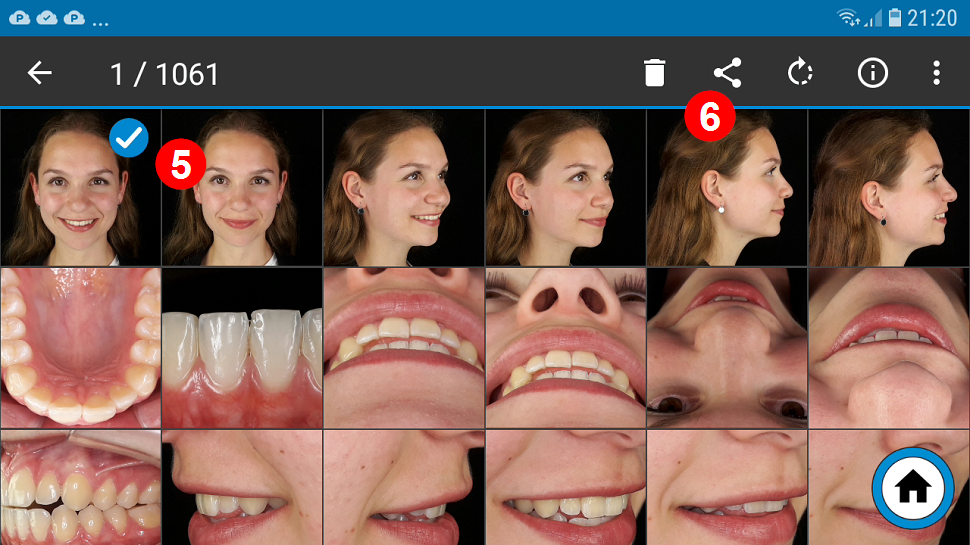
Select the image you want to edit and then tap on the “Share” icon 6. Now select the “Edit picture” button 7 from the lower screen.
Note: If this does not appear, you may have selected more than one image.
With the “Edit picture” function, you can only select one picture.
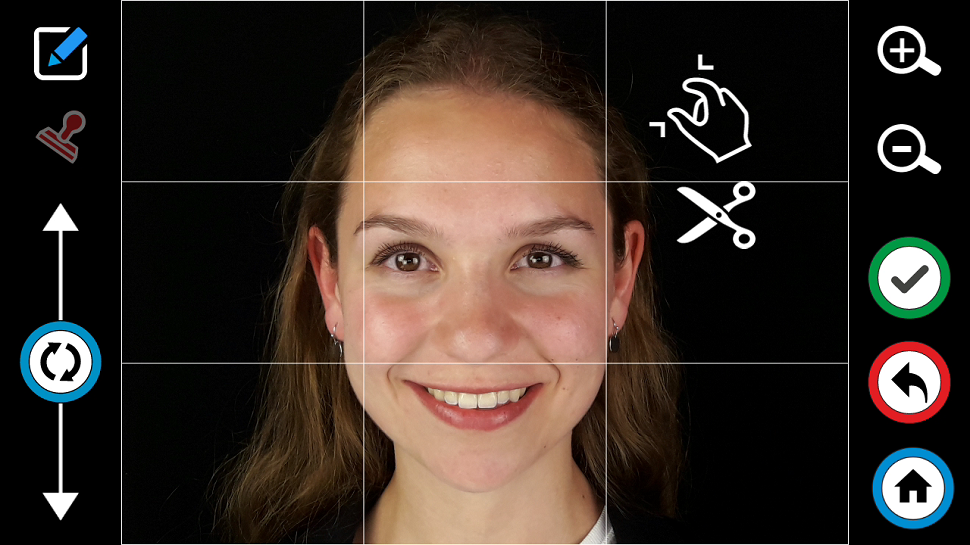
The “Edit image” screen now appears, where you can crop or rotate the image, or add stamps or drawings to the image.
You can also Edit view.
Select the image you wish to print and
then tap on the “Share” icon 6.
Now select the “Mopria Print” button 9 from the lower screen.
Note: If this does not appear, you may have selected more than one image.
With the print function, you can only select one image.
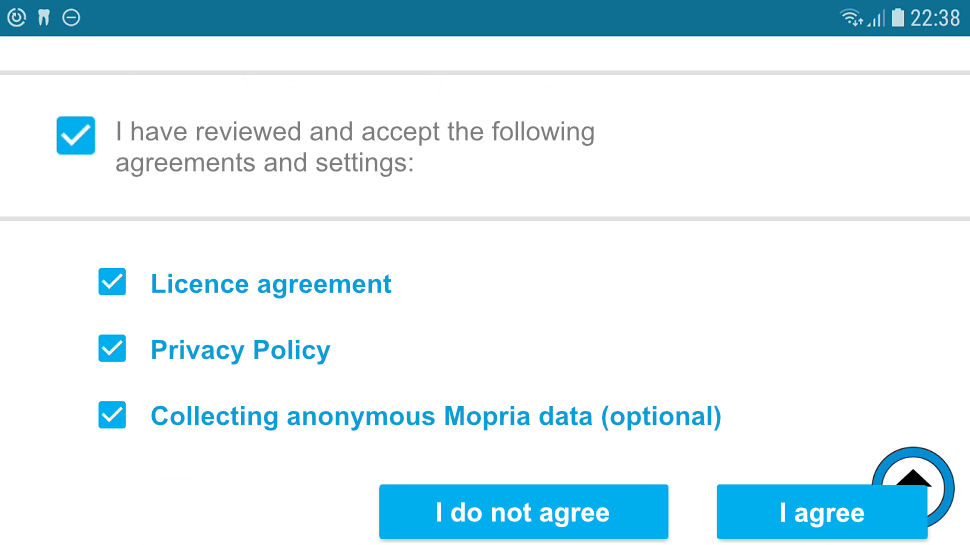
When you start the print application for the first time, the following message appears:
Please confirm this by tapping on “APPROVE”.
Your printers in the WLAN network will then be searched for automatically.
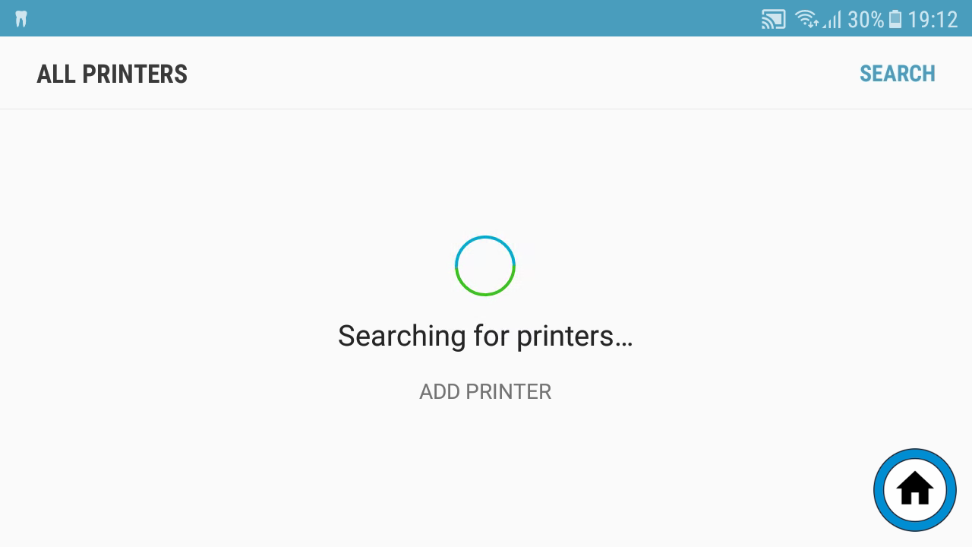
If no printer is found during the automatic search, please tap on “ADD PRINTER”.
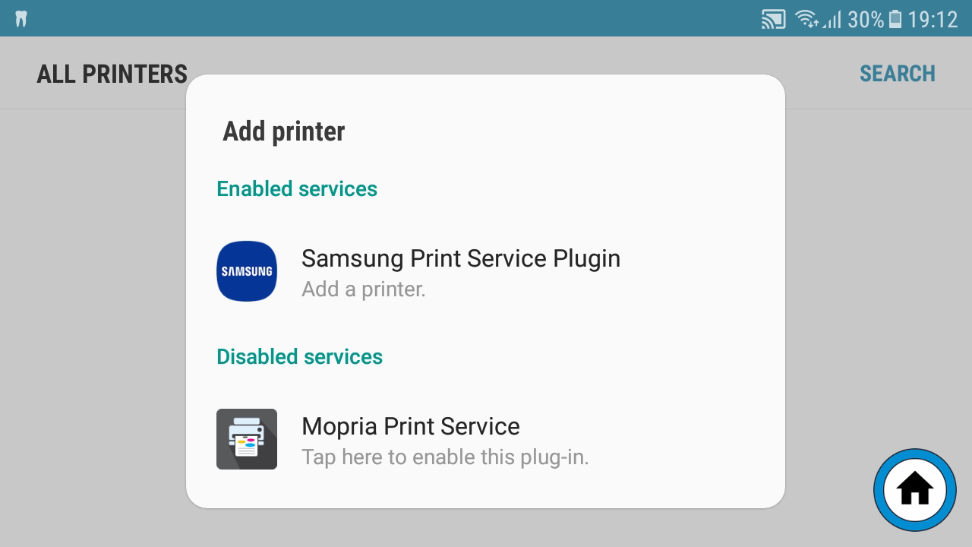
Then select “Mopria Print Service”
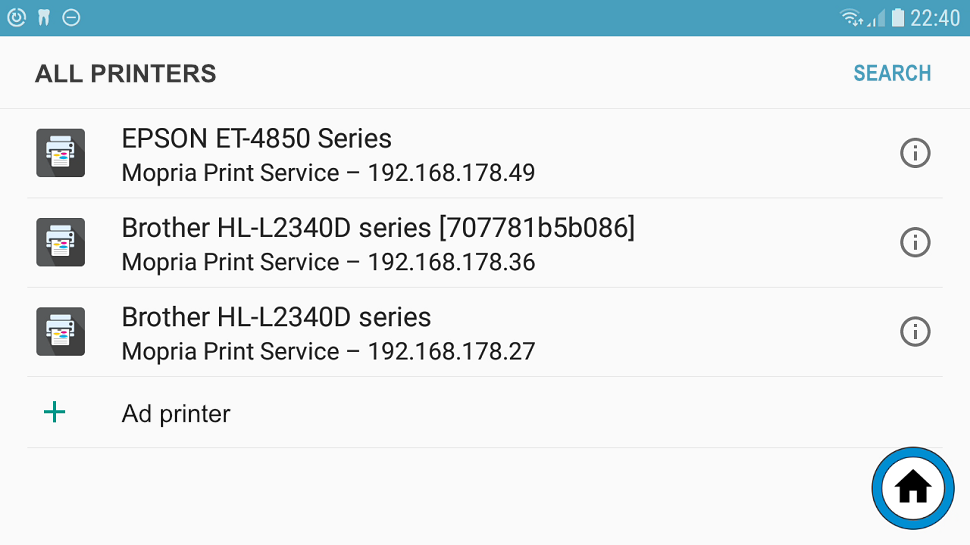
After another search, all printers accessible via WLAN should now be printers should now be listed.
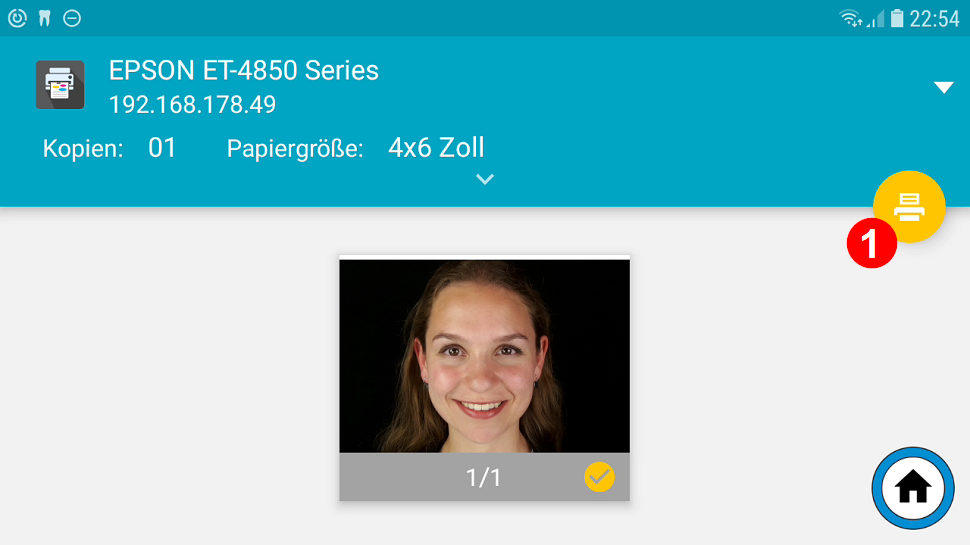
After marking, tap on the “Share” icon 6

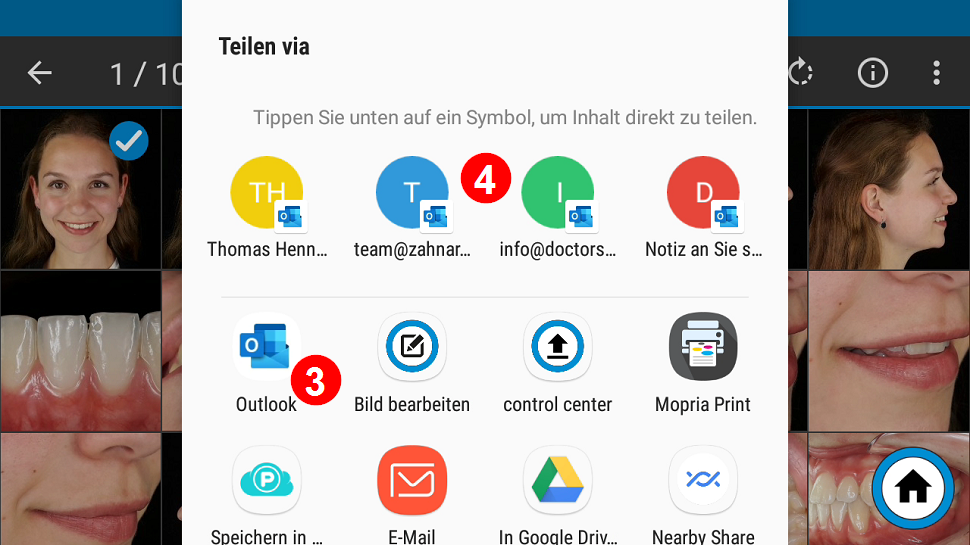
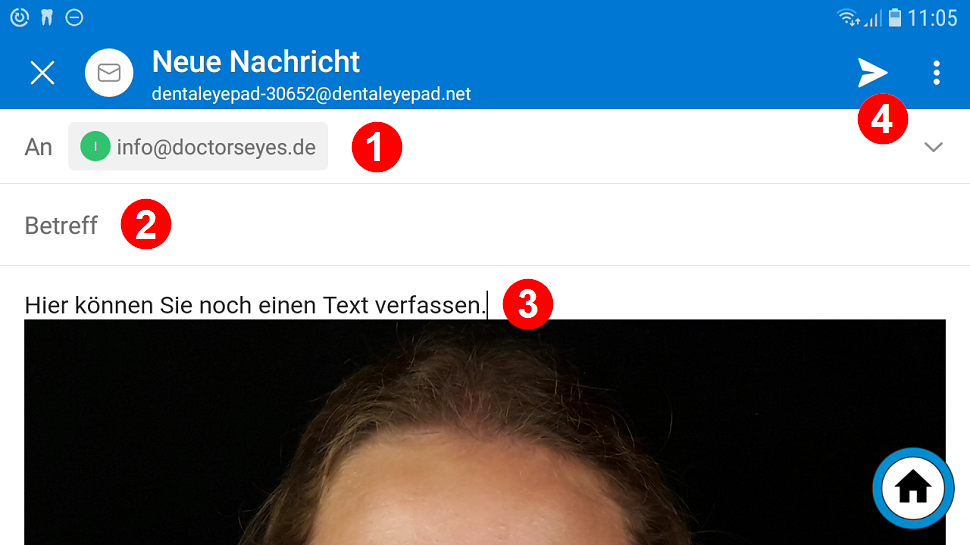
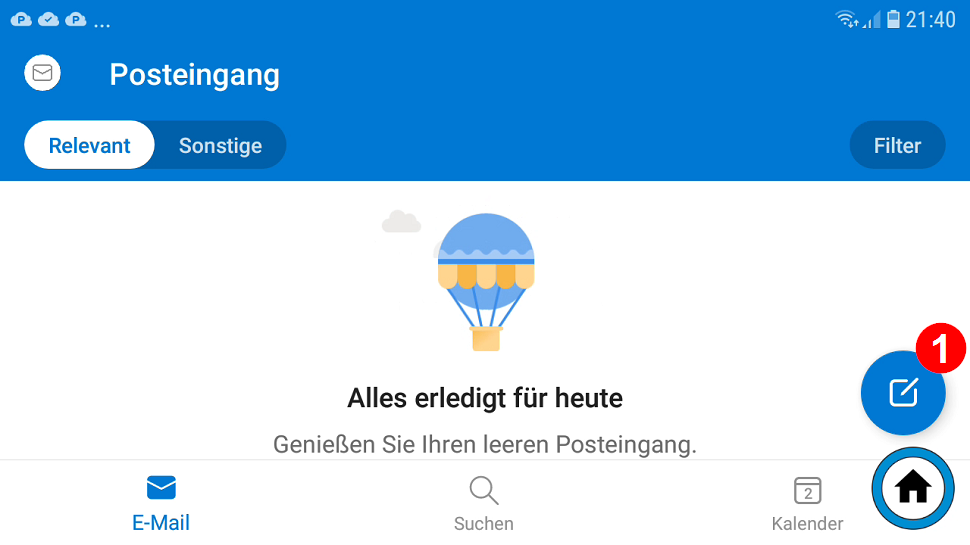
The message window now appears. If you have started the mail program using an e-mail address (4), this is automatically entered in the addressee field.
You will be asked whether you want to send the images in their original size or reduced.
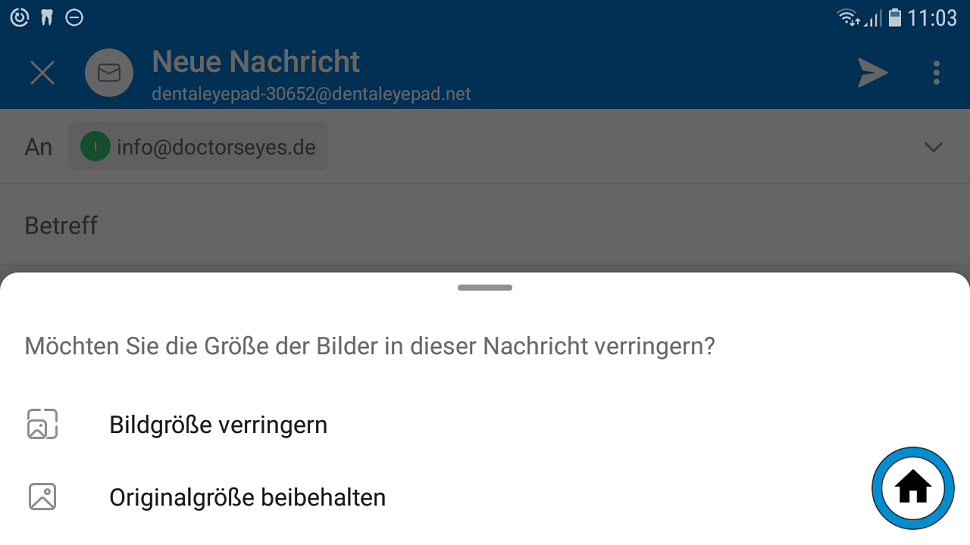
If you are sending several images at once, you should select “Reduce image size” so that the memory requirement for the e-mail is not too large.
If the recipient has not already been preselected, you can now enter it here.
You can also enter a “Subject” 2 and insert text above the image if required.
Click on the “Send” icon 4 to send the e-mail.
With the help of the support apps, we can connect to your dentaleyepad when it comes to special settings or assistance.
In order to be as flexible as possible, remote maintenance programs from three different providers are installed on your dentaleyepad.
Select via the cloud icon and then press the button with the “SOS” label.
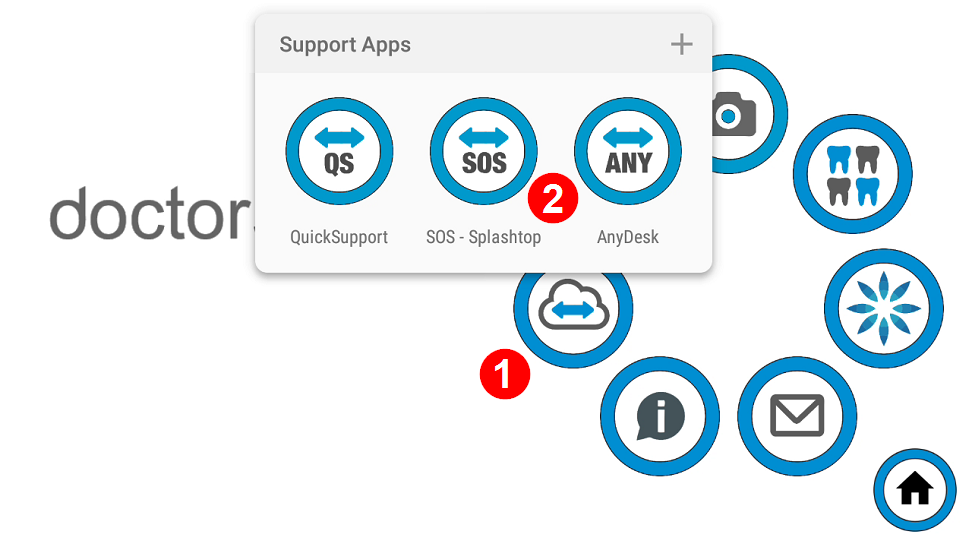
You will now see the following screen with a 9-digit number:

Give us this 9-digit number by phone or send it by e-mail.
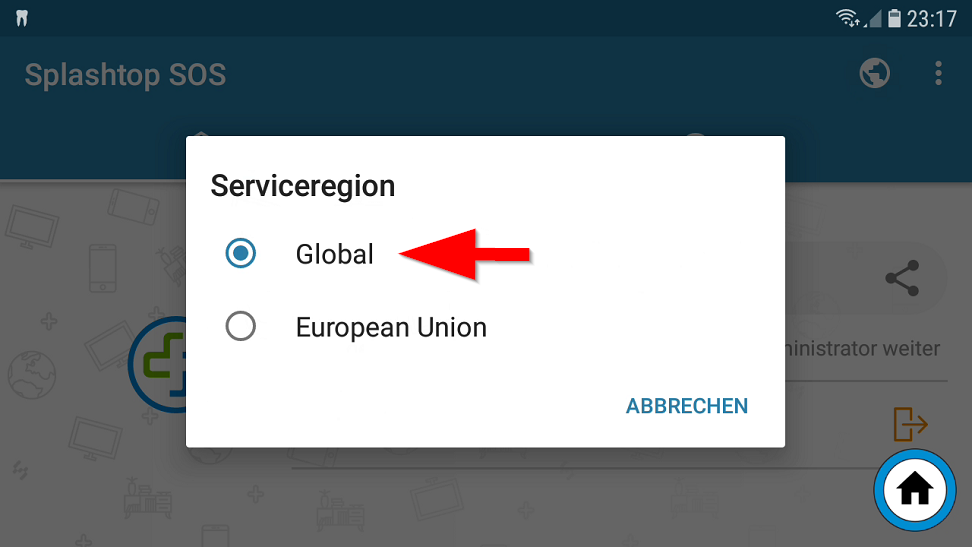
Global” must be selected here.
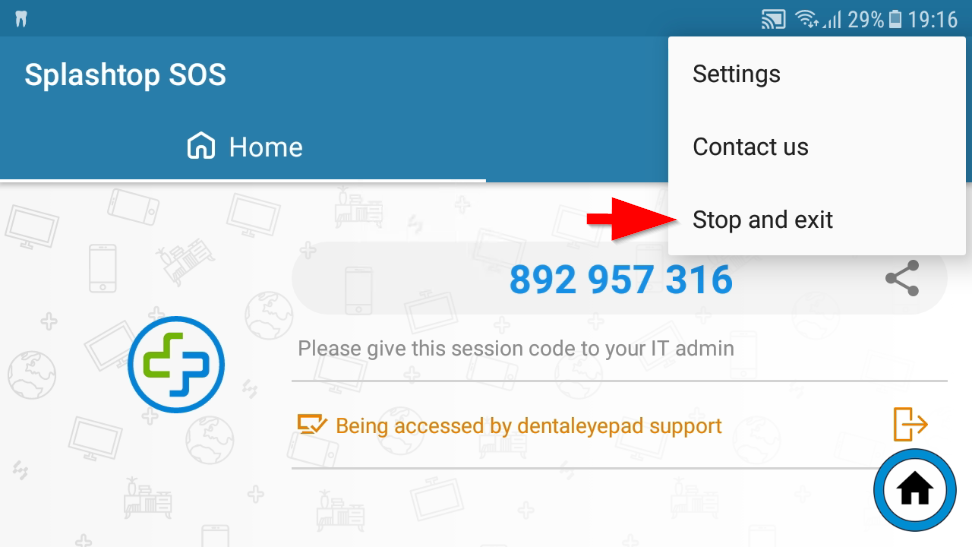
When prompted, please select the three dots at the top right. The following screen appears.
Please select “Stop and exit” here. Then start the Splashtop SOS app again using the cloud icon.
You will now receive a new number. Please let us know again by telephone.
Tips and tricks:
Quick selection of the Workflow Editor
Quick selection of the single-shot editor
How can I photograph X-ray images?
How can I crop images automatically?
Can I also take photos from the 12 o’clock position?
Can I also save the patient name visibly in the image?
How can I improve the depth of field?
How can I adjust the colors?
How can I automatically color code my initial findings, intermediate findings and final findings?
